

How to run System File Checker in Windows 10
Description: This article will show you how to run a System File Checker (SFC) Scan on your Windows 10 computer. This tool scans for corrupted Windows files and attempts to repair them. This is a good tool to use if you are having issues with Windows features not working or strange crashes that are hard to pinpoint to a specific cause.
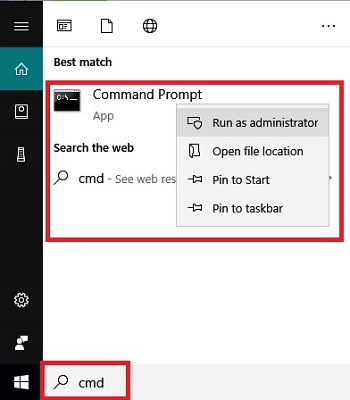
- Open an elevated command prompt window by typing CMD into your Windows search bar and then right click on Command Prompt within the resulting list and select Run as adminstrator.
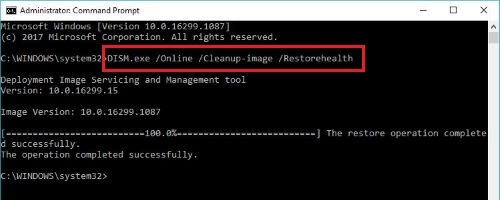
- Run the Deployment Image Servicing and Management (DISM) tool first - This tool will check to make sure that the files you are going to use to repair the system are not corrupted or outdated, and possibly update them before you run the SFC utility. Type DISM.exe /Online /Cleanup-image /Restorehealth and then press enter on your keyboard. This will probably take some time to complete.
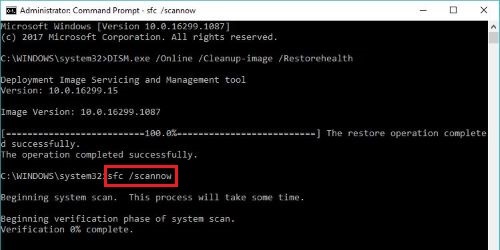
- When the DISM tool has finished, type sfc /scannow into the administrative command prompt window and press enter on your keyboard. This scan will take some time to complete and attempt to repair corrupted Windows files on your system. There can be cases where it detects corruptions and is unable to repair them, if so, you will need to investigate alternative options such as refreshing Windows or reinstalling Windows.
Technical Support Community
Free technical support is available for your desktops, laptops, printers, software usage and more, via our new community forum, where our tech support staff, or the Micro Center Community will be happy to answer your questions online.
Forums
Ask questions and get answers from our technical support team or our community.
PC Builds
Help in Choosing Parts
Troubleshooting