

IMPORTANT: How to install an Intel CPU
The CPU or Central Processing Unit is the brain of the computer. All commands for data or calculations pass through the CPU. The current Intel® form factors are called LGA 775, 1155 and 2011. The main difference between these form factors and previous is there are no pins located on the processor. Instead, there are contact areas that are touched by pins located on the motherboard socket itself.
This guide will show you how to install an Intel® CPU and heatsink.
Note: Be sure to use proper precautions including an anti-static wristband or an anti-static mat to avoid hardware damage. Avoid touching the metal contacts on the processor, or the pins on the motherboard.
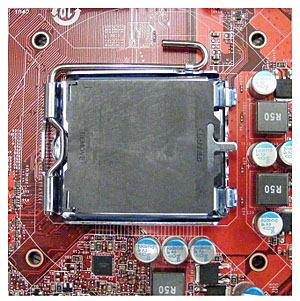
1. Locate the processor socket on your motherboard. The color and exact placement of your motherboard may differ slightly.
The CPU is now installed in the socket. The next steps will show how to add a heatsink to keep it cool.
Installing a Heatsink
The Heatsink is vital to the overall health of your CPU. The heatsink is designed to take the heat generated by the processor and dissipate it to keep the CPU running cool and efficiently. There are a number of different styles and types of heatsinks. This section of the guide will reference a stock Intel® heatsink.
4. Connect the fan cable to the CPU fan connector on the motherboard. This is normally labeled CPUFAN or something similar.
This guide will show you how to install an Intel® CPU and heatsink.
Note: Be sure to use proper precautions including an anti-static wristband or an anti-static mat to avoid hardware damage. Avoid touching the metal contacts on the processor, or the pins on the motherboard.
1. Locate the processor socket on your motherboard. The color and exact placement of your motherboard may differ slightly.


The CPU is now installed in the socket. The next steps will show how to add a heatsink to keep it cool.
Installing a Heatsink
The Heatsink is vital to the overall health of your CPU. The heatsink is designed to take the heat generated by the processor and dissipate it to keep the CPU running cool and efficiently. There are a number of different styles and types of heatsinks. This section of the guide will reference a stock Intel® heatsink.


4. Connect the fan cable to the CPU fan connector on the motherboard. This is normally labeled CPUFAN or something similar.

That's it! Your installation is complete.
Technical Support Community
Free technical support is available for your desktops, laptops, printers, software usage and more, via our new community forum, where our tech support staff, or the Micro Center Community will be happy to answer your questions online.
Forums
Ask questions and get answers from our technical support team or our community.
PC Builds
Help in Choosing Parts
Troubleshooting