
The Complete Guide to Restoring and Resetting Windows

Modern Windows is a robust and resilient operating system. Long gone are the days of needing to format your entire PC every year or two just to keep it working properly. But that doesn’t mean it’s impossible to run into problems. Fortunately, most of those are easily fixed with a reset, or returning to a restore point.
 Photo: Jacob Bobo
The latest versions of Windows 11 make that easier than ever, too. Just be sure you backup anything important before getting started.
How to manually create a Restore Point in Windows
Restore Points are save states in Windows that return your installation to a previous time where you know it worked properly. It reverts your files, installed applications, Windows settings and system files – even the registry. If you encounter a nasty blue-screen error or a problematic driver that you can’t seem to fix, returning to a previous restore point is a quick and easy way to get your system working again.
Before you can return to a restore point though, you have to make one. While your PC will create these automatically, you can also create them yourself. Here’s how.
Windows 11
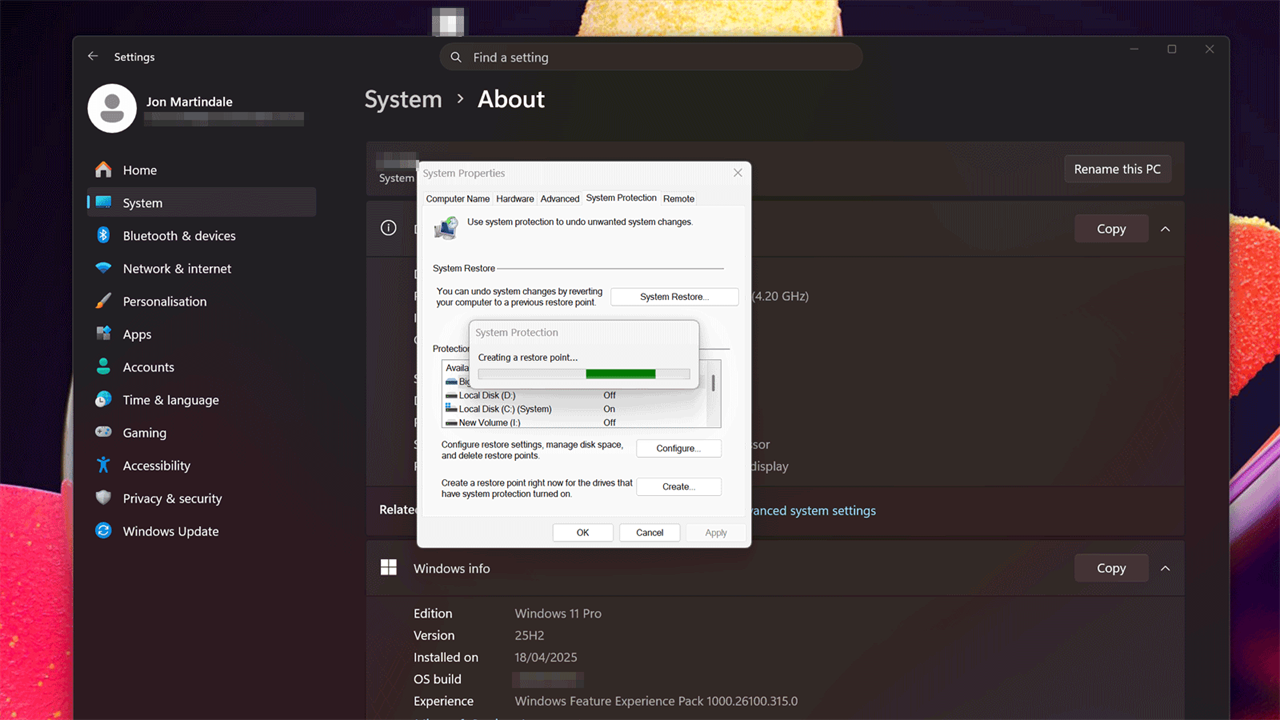 Photo: Microsoft/Jon Martindale
- Use Windows search to look for “Create a Restore Point,” and select the corresponding result. Alternatively, navigate to Settings > System > About > Advanced System Settings.
- Select the System Protection tab, if it isn’t already.
- Select Create at the bottom of the window.
- Give the system restore point a name, like the current date, then select Create.
- Wait for the restore point to be created. Once notified that it has been created, there is a definitive place to return to if the device runs into problems in the future. Just be sure to update a few months from now to keep a contemporary system restore point.
- To confirm it was created successfully, select System Restore from the main “System Protection” tab. The system protection tab features a list of all the System Restore Points that the PC has created so far.
Note: If you find you are unable to create a System Restore Point, confirm that you have enough free space on your main SSD/HDD. You can also select Configure on the “System Protection” tab, and confirm that Turn on system protection is enabled.
Windows 10
The process for manually creating a System Restore Point is much the same on Windows 10, the steps are just slightly different.
- Navigate to System > System Protection, then ensure the System Protection tab is selected.
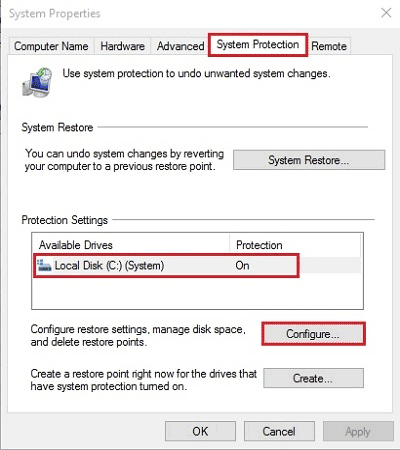
Photo: Microsoft
- Select Configure to confirm Turn on system protection is enabled, and to choose how much of the drive’s storage capacity to allocate to System Restore Points.
- When ready to manually create a System Restore point, select Create.
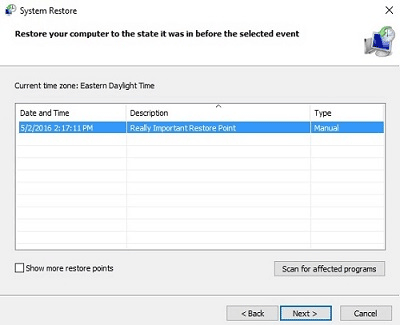
Photo: Microsoft
- The process will take between a few seconds and a few minutes depending on the drive’s read/write speed and the amount of data being backed up. To confirm a backup was successfully created, select System Restore from the main System Protection tab and verify the backup is available.
How to start a System Restore in Windows
If you’ve run into a problem on your Windows PC that you just can’t fix, reverting to a Restore Point is a great way to get your PC working again. It will return your PC to a previous point in time when the restore point was created. This can mean removing applications, system files, and registry settings.
With that in mind, it’s a good idea to back up anything important on your PC before reverting to a restore point. You can use cloud storage or external media like a portable SSD or hard drive to back up your personal and work files, and any important data like game saves.
Windows 11
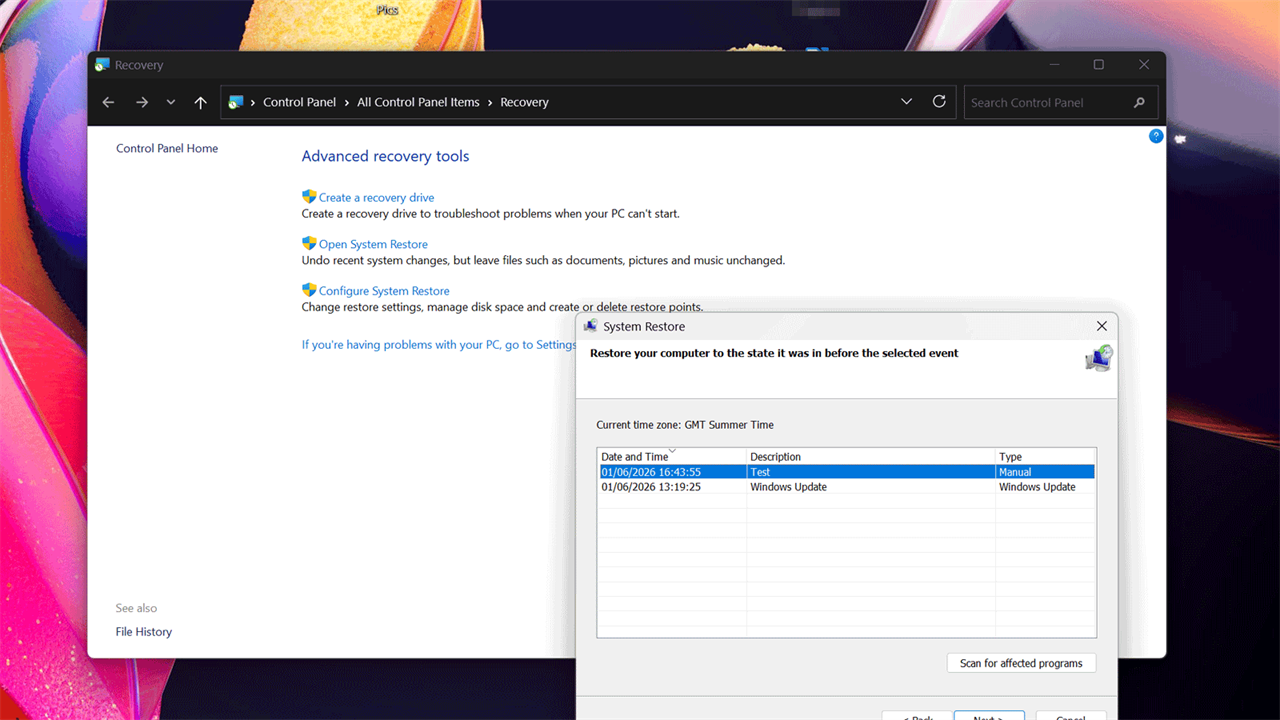 Photo: Microsoft/Jon Martindale
- Use Windows search to type in “Recovery,” and select the corresponding result.
- Select Open System Restore.
- Select Next.
- From the list of system restore points, select the one that is either the most recent, or a known, stable restore point, then select Next. To see what applications and drivers may be affected by reverting to the restore point, select Scan for affected programs. After a few moments it will give a report on what may be changed or uninstalled by reverting to the restore point.
- When ready, select Finish to begin reverting to the restore point. When Windows has finished, it will restart the PC automatically.
How to create recovery media for a Windows computer
 Photo: Microsoft/Jon Martindale
A recovery drive can help you reset or repair your Windows installation if you run into problems and can no longer boot. They’re useful throughout our guide, so if you haven’t yet, here’s how to make a recovery USB.
- Find a spare USB drive (or pick one up) with at least 8GB capacity, but a larger 16GB or 32GB drive is recommended. If using an old drive, ensure all files are fully removed, as it will need to be blank.
- Plug in the drive to a space USB slot.
- Use Windows search to look for “Recovery Drive,” and select the corresponding result.
- Make sure Back up system files to the recovery drive is selected, then select Next.
- Select Create. The recovery data will then be copied to the USB drive. Depending on the speed of the chosen USB drive, this process can take a while.
To reinstall Windows from a recovery drive, boot to the Windows Recovery Environment using the recovery drive. Once the Windows Recovery Environment loads, select Recover from a drive.
If you want to just remove apps and settings, select Keep my files to retain your personal files and data. If you’d rather remove everything and start entirely fresh, select Remove everything. Then follow the on-screen instructions to complete the factory reset.
Windows Recovery Environment
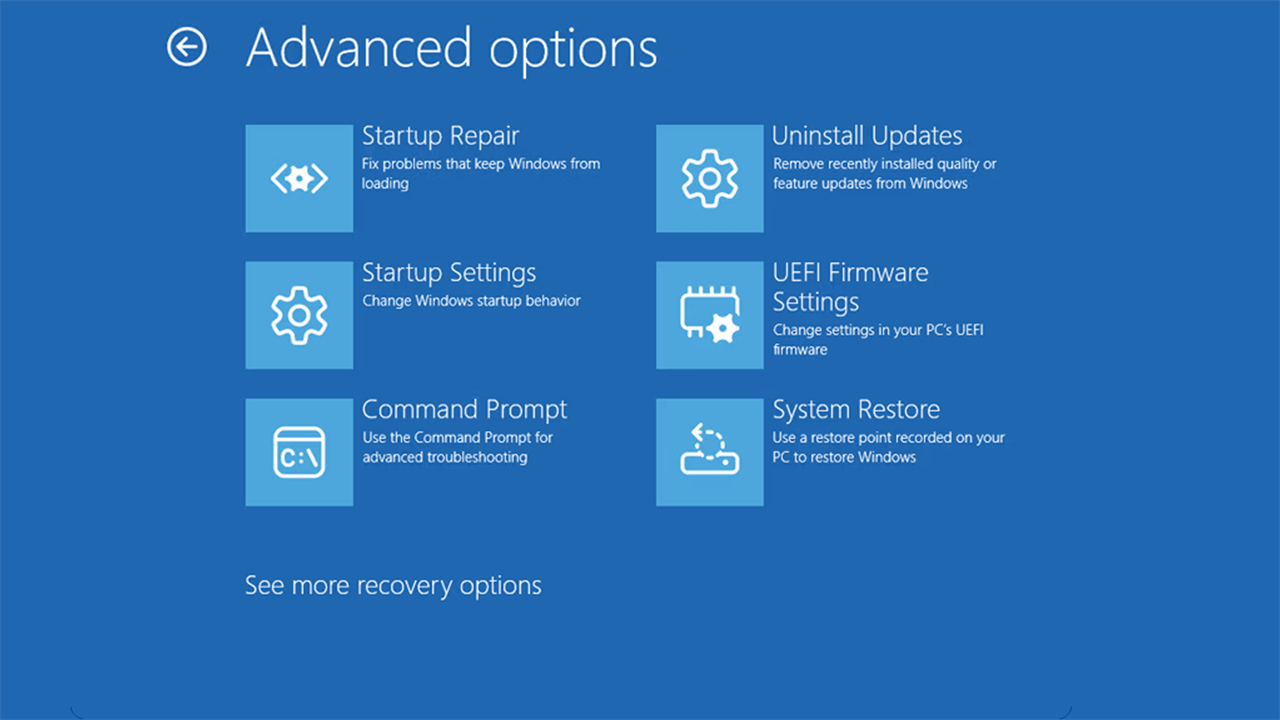 Photo: Microsoft
If you encounter a serious issue with your Windows PC and it can no longer reliably boot into Windows, you can also revert to a restore point from the Windows Recovery Environment. Here’s how to do it.
Windows 11
- A system will automatically access the Windows Recovery Environment if it fails to boot three times in a row. However, it is also possible to boot straight to the Windows Recovery Environment using Windows recovery media like the USB drive created above.
- Once in the Windows Recovery Environment, select Troubleshoot > Advanced options > System Restore.
- Select the restore point to revert to from the list of options. If all restore points are not visible, click Show more restore points for the full list. To check what applications may be affected by reverting to the restore point, select Scan for affected programs.
- Select Next, and when ready, select Finish to begin reverting. When Windows is finished, select Restart to reboot the system. It should then boot up to a restored Windows, fully functioning.
Windows 10
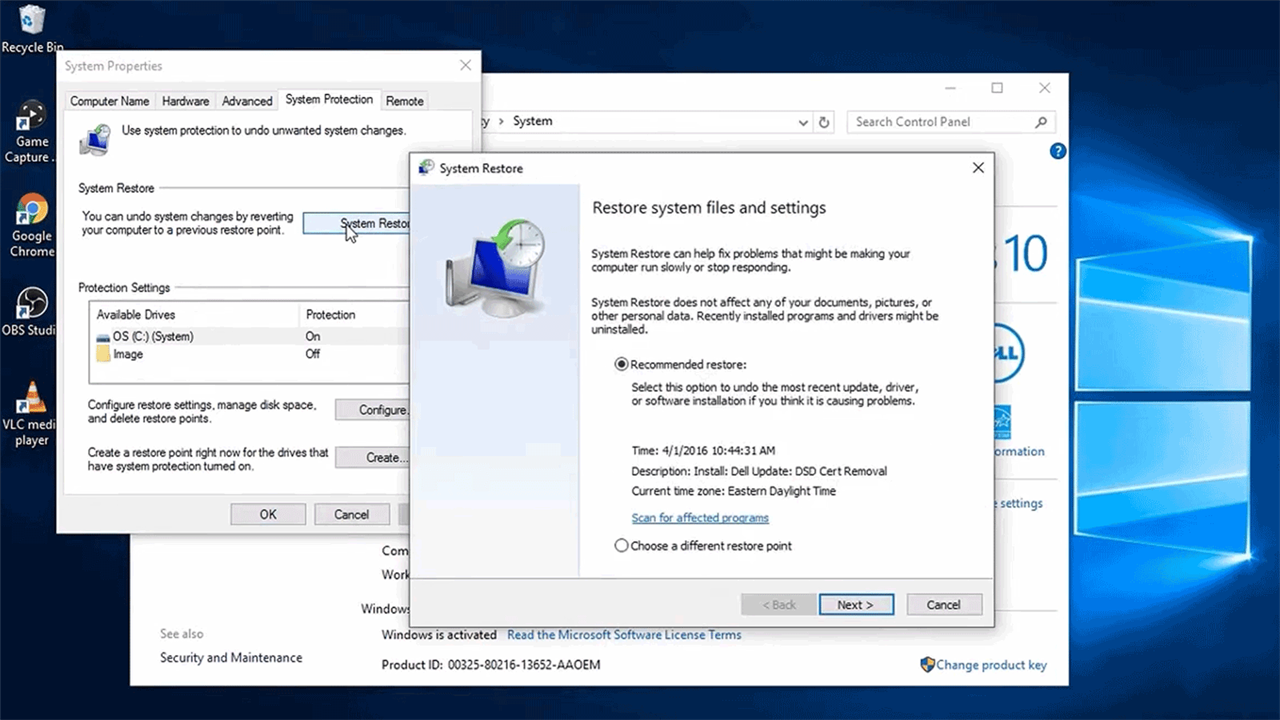 Photo: Microsoft
- Navigate to System > System Protection, then ensure the System Protection tab is selected.
- Select System Restore.
- Windows will recommend a restore point, with details of the time and date it was created. To see which applications may be affected by the roll back, select Scan for affected programs. To use the selected restore point, select Next. To select a different restore point, select the toggle next to “Choose a different restore point,” then select Next.
- Select the preferred restore point from the list if necessary (Show more restore points can be selected for the full list). When ready, select Next.
- Select Scan for affected programs to see which applications may be impacted.
- When ready, select Finish to begin the System Restore process. It may take anywhere from a few seconds to a few minutes depending on system hardware. When it’s completed, the PC will restart. When it boots back up to Windows, the system should be back as it was at the restore point.
How to perform a Factory Reset on a Windows
Resetting your Windows installation to its factory default settings can be a great way to improve performance, fix stability issues, and clean out any applications and settings you no longer need. There are various methods for doing so, depending on the state of your PC.
This part of the guide is specifically for users that can boot into their Windows OS. If the device will not boot into Windows at all, skip to the next section, “How to reset a Windows machine that won’t boot.”
Note: Factory resetting your Windows PC can remove your personal files as well. You can have it save those files, but it’s always a good idea when resetting or refreshing your Windows PC to back up any sensitive or important files and data, just to be sure.
Windows 11
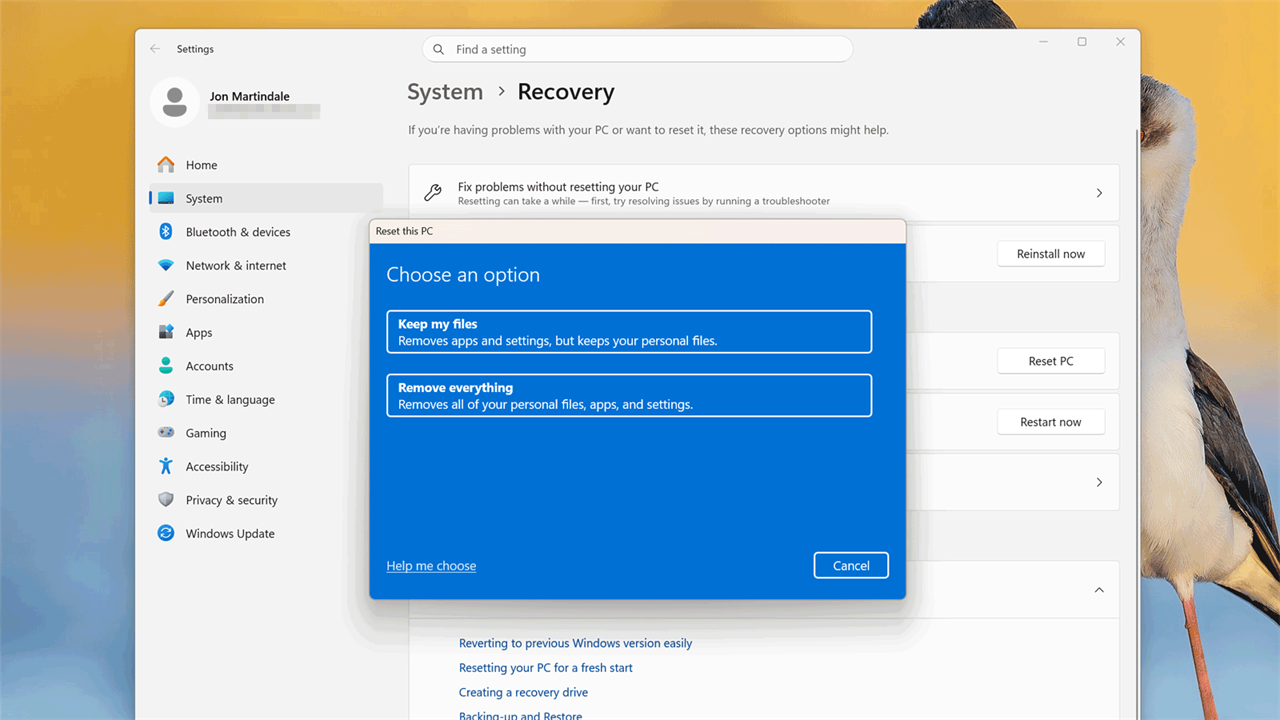 Photo: Microsoft/Jon Martindale
- Use Windows Search to look for “Reset,” and select the corresponding result.
- Select Reset PC.
- To just remove apps and settings, select Keep my files to retain personal files and data. To remove everything and start entirely fresh, select Remove everything. Help me choose can help provide additional information on each option.
- Select Cloud download to download and reinstall Windows – some additional storage capacity will be needed for the download – or Local reinstall to reinstall Windows from the device. Cloud download is more reliable if the reset is being brought on by an OS issue, as it will use a completely fresh Windows install, rather than (potentially corrupted) local files.
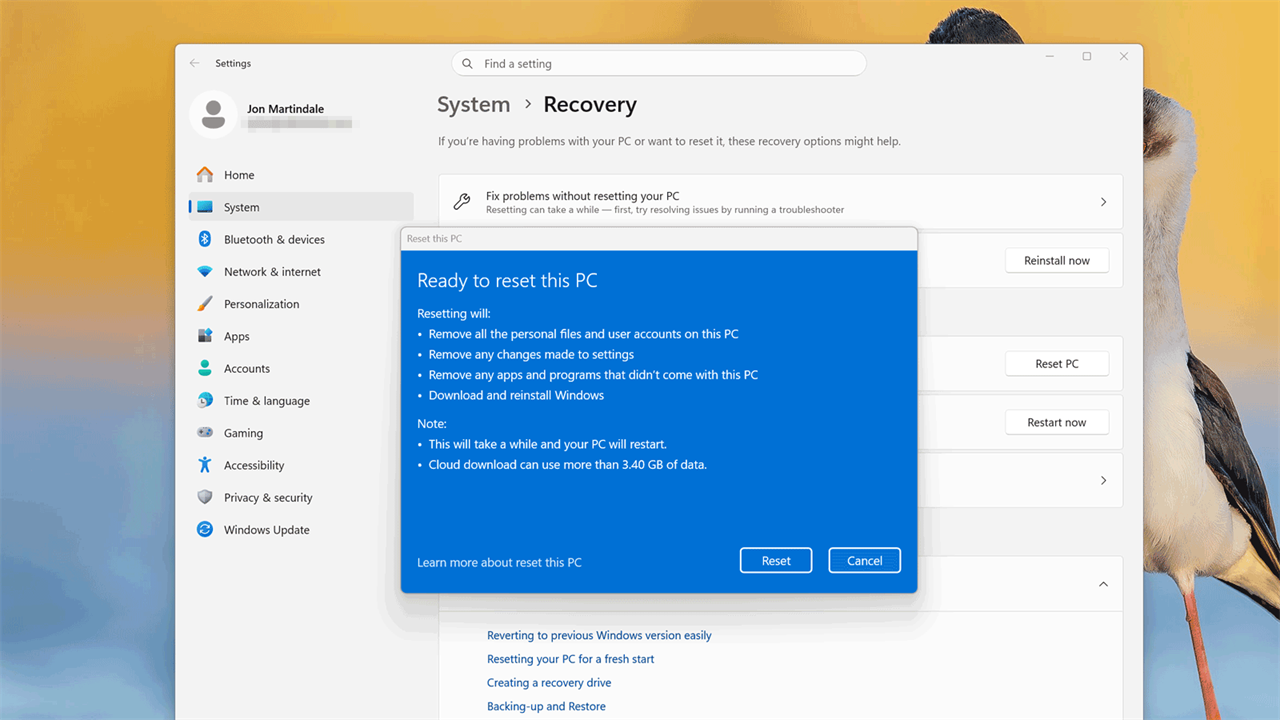 Photo: Microsoft/Jon Martindale
- Select Change settings to adjust how the drive is cleaned (quick, or more in-depth and secure) and what files are deleted. Select Confirm. Then select Next.
- Windows will then spend a few moments getting things ready before asking to confirm choices one final time. Once everything is accurate, select Reset to begin the factory reset.
- Windows will download the files it needs, then complete the reset. The PC may restart several times during the process.
- Once finished, there will be a fresh version of Windows to set up on the machine. Set up this copy of Windows just like any other.
Windows 10
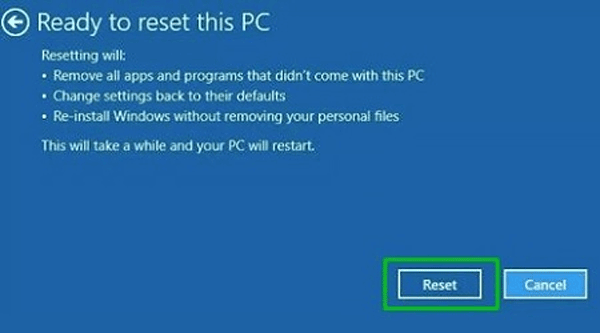
Photo: Microsoft
- Navigate to Settings > Update and Security > Recovery. Then under the heading, “Reset this PC,” select Get Started.
- To just remove apps and settings, select Keep my files to retain personal files and data. To rather remove everything and start entirely fresh, select Remove everything.
- A list of affected apps will be shown. When ready, select Next.
- Once more, confirm the reset process, then select Reset.
- Windows will then perform the factory reset. It may reboot several times during the process. Once complete, the system will either require a new Windows user be created, or an existing account.
How to reset a Windows machine that won’t boot
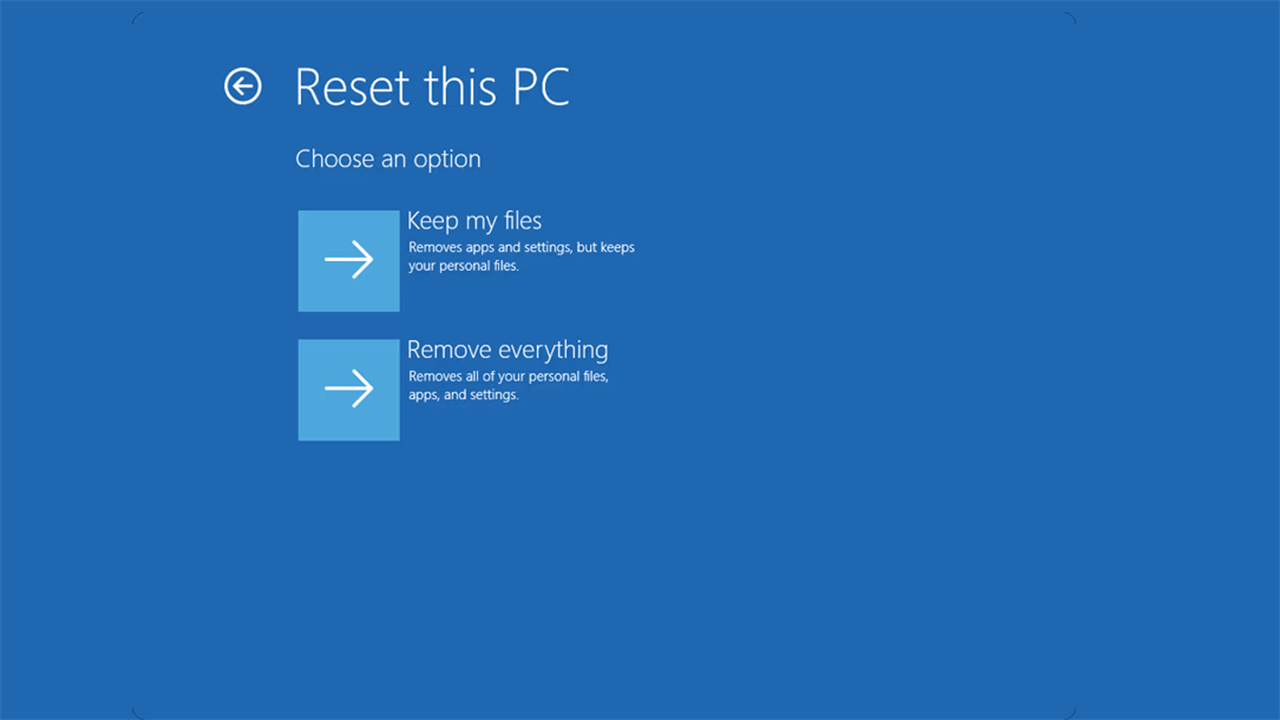 Photo: Microsoft
If you encounter a serious issue with your Windows PC and it can no longer reliably boot into Windows, you can also reset it from the Windows Recovery Environment. Here’s how.
- A system will automatically access the Windows Recovery Environment if it fails to boot three times in a row. However, it is also possible to boot straight to the Windows Recovery Environment using Windows recovery media like the USB drive created above in the section titled “How to create recovery media for a Windows computer.”
- Select Troubleshoot > Reset this PC.
- To just remove apps and settings, select Keep my files to retain personal files and data. To remove everything and start entirely fresh, select Remove everything.
- Follow the on-screen prompts to complete the factory reset. It will take some time to complete and may need to reboot the PC several times.
- Once finished, there will be a fresh version of Windows to set up on the machine. Set up this copy of Windows just like any other with either a new account and associated network access, or log in to the original account, depending on the chosen reset options.
How to reinstall Windows using Windows Update
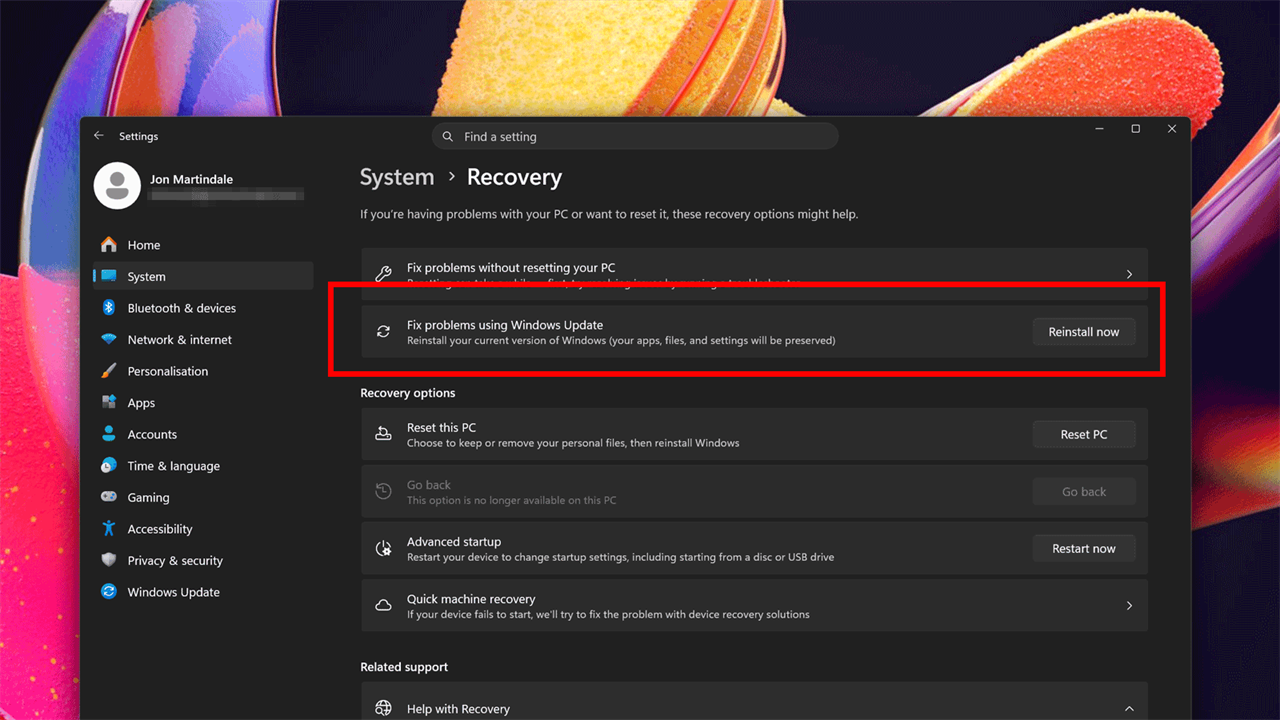 Photo: Microsoft/Jon Martindale
If you’re happy with how your PC is, but feel like Windows itself is causing some problems, you can reinstall the current version of Windows from Windows Update.
- Navigate to Settings > System > Recovery
- Next to the subheading, “Fix problems using Windows Update,” select Reinstall Now.
- Read the window that pops up to confirm what will happen, then select OK. To have the system automatically restart, toggle the respective box.
- The reinstall process will begin downloading and installing a repair version of the current Windows update. Once the reinstall is complete, reboot the PC if it does not do so automatically.
How to locate data on an old hard drive using Windows
If you have an old hard drive or SSD that you want to extract data from, the easiest way is to use an external enclosure that connects to your PC via USB.
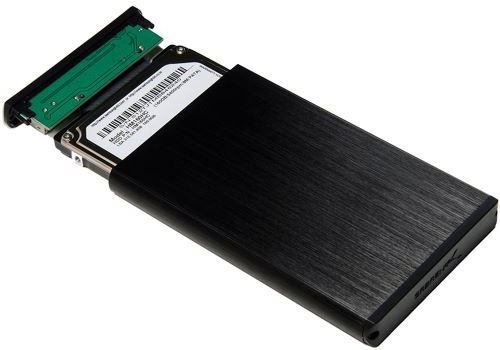
Photo: Micro Center
- Purchase an appropriate enclosure. Micro Center sells a range of options, here.
- Install the HDD/SSD into the enclosure following the manufacturer’s instructions.
- Plug the enclosure into the Windows PC. The PC may take a moment to recognize the drive. Once it is recognized, open File Explorer and locate the drive on the left-hand menu. Alternatively, navigate to This PC and find it listed there.
- With access to the HDD/SSD, it is possible to manually copy and paste any important data still on the drive. Be sure to check in Users > (Your account name) to find desktop files, personal pictures, downloads, and many game saves.
If you don’t want to recover the files manually, or find that the drive doesn’t operate as it should, Micro Center offers a wide variety of data recovery services that can even help recover deleted files. For all the details, check out our Data Backup and Recovery Services.
And those are the basics for resetting your Windows machine and getting it back to a healthier state. Of course, doing a full reset can still be intimidating. If you have more questions about resetting your Windows machine or if you just have worries about the health of your computer or device, our experts can help! Schedule an appointment with the Knowledge Bar by visiting our Services webpage.
More from MC News
- The Complete Guide to Essential Browser Settings
- Complete Guide to Windows 11 Disk Management
- Run AI Locally: The Best LLMs for 8GB, 16GB, 32GB Memory and Beyond
- How to Build a PC with a Hardline Water-Cooling Loop
- 3D Print a Mac Mini Monitor Mount
- Keyboard 101: Intro to Computer Keyboards
Jon Martindale is a freelance technology journalist and writer from Gloucestershire, UK. He's written for a range of publications over a 20-year career, including DigitalTrends, USNews, Forbes, and Lifewire, among many others. Over that time he's written countless how-to guides, best-of lists, hands-on reviews, and in-depth op/ed features.
He has been building and working with computers since his teens, and loves nothing more than trying out the latest components and gadgets to see what they can do. When he isn't staring at a monitor, he can be found chasing after with his two young children, playing board and roleplaying games, or walking his French bulldog cross.