
10 Windows Vista Tricks (with some Windows 7 updates)
Magazines and web logs have been full of suggestions and tips, many of which appeared in the first month or two of release. The tips and tricks that are offered might be organized into two main groups, those that make Vista look and act more like Windows XP, and those that showcase new features and advantages included in the new release.
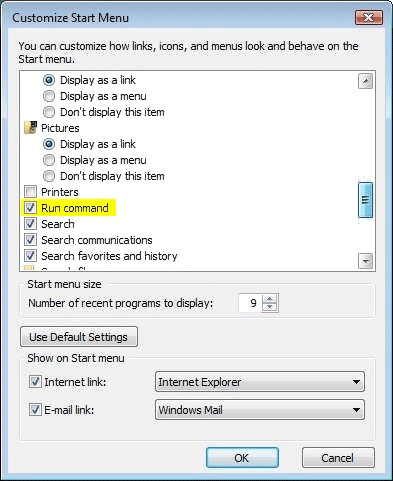
Showing the "Run" command is one of the customizable settings in Windows
XP or Vista or Windows 7.
There are loads of possible tweaks, hacks, and suggestions on how to personalize or "improve" Vista’s configuration. What I want to offer instead, are ten features or settings that I find to be especially useful. By the way, for some of you hard-core XP users, many of these "tweaks" have an XP equivalent. Turning on the run command in the start menu might be considered a "tweak", but it’s not really new. This same choice appears in the XP customize options of the Start Menu Properties. Some changes are new under Vista, or there may be some new twist that Vista’s increased security features may create.
Tip #1: Compatibility Mode
Just as there was with Windows XP, Vista(and Windows 7), Windows includes a feature in the properties tab of applications to use compatibility mode when you run or install programs. The trick is to remember to try it when you have problems installing or running an older program. This same tab includes a checkbox that allows you to run the application in administrator mode as well. This could be important if the setup program is trying to add or modify registry settings. - For an install process like this, I turn it on. (For example, if you wanted to open a Command Prompt window with administrator access, create a new shortcut to CMD.EXE, or copy the existing one, and then right click to select "properties" Add a check to the box next to "Run as Administrator".)
A real-world example making a "legacy" (a genuine antique in computer terms) scanner and twain software work: I still use my SCSI Microtek IISP flat bed scanner with an old version of the ScanMaker software. (When I purchased this scanner new, Windows 95 was shipping.) First, I had to find a SCSI adapter that Vista would either recognize or that I could push the old XP driver support in. My older PCI Adaptec cards did not have Vista driver support, although the Vista update service came back with new drivers about a week after I installed a Siig brand SCSI adapter. Once the scanner is connected to the SCSI adapter, Vista will detect the hardware during a hardware refresh in Device Manager. I never did find a scanner driver support under XP, and Vista is no different, so the trick is to let it look, and then make sure that the checkbox for "never check for drivers" is in place before clicking on "Finish" at the "Cannot install this hardware" window. Just as I found when installing it under Windows XP, the trick is to install the ScanMaker (Twain) software in compatibility mode for Windows NT. If you just try to install it, it will assume the system is a Win9x environment and create DOS-level ASPI driver lines in the autoexec.bat and config.sys file -- which neither XP nor Vista will bother to look at. When the scanner software tries to directly access the non-existent DOS driver, XP promptly blue-screens and reboots (I didn't even try to test this under Vista.) Downside: Vista’s Camera and Scanner Wizard will not see the device, and there are no scanner drivers that make it show up in device manager (you will find it listed in "Other devices"). But when using programs that do support Twain scanners, the scanner software application will launch and run fine under XP.
However, under Vista I encountered a new problem (remember, I mentioned "twists" created by Vista Security features.) When launching ScanMaker from inside Corel (formerly Jasc) PaintShop or Photoshop Elements, the application generated an "Error accessing the Twain device". Suggestions include reinstalling the software and verifying that the Twain application and directory exists. I traced the problem to the C:\Windows\Twain32 directory where I found that all the correct files exist, but the subdirectory that is created during scanning did not. This is not something that is created during installation, but that is updated as a temporary work directory when the program runs. Vista restricts much of the Windows and Programs directories, not allowing access to change things by your average user. To correct this, I used a brute-force approach to modify the twain32 directory’s security settings. I had to first "take ownership" of the Twain32 directory, and then change security levels so that the listed user and system accounts had "full access", allowing the system, application, or users to be able to change the contents of this directory at any time. Once the new file security access was changed, the old ScanMaker software ran fine.
Note: This same problem appears in both Vista and Windows 7 because of the User Access Control settings that lock certain types of activity down, and prevent applications from making changes to the registry, program directories, or even some Windows file directories. Programs that do not make changes in an "approved" fashion are blocked. You may or may not receive a message that tells you why it failed to run. The solution may be to enable the option in the compatibility selections to "Run as Administrator". Sometimes, changing the directory permissions will also work, as was described with the Windows\Twain32\ directory above. Disabling UAC is not a recommended solution.
|
Note: 32 vs. 64-bit versions of Windows: The compatibility trick I describe in Tip #1 only works because I was running the 32-bit version of Windows. 64-bit versions of Windows XP never really took off, mostly because of the lack of driver support for various hardware. That changed with Vista, and with Windows 7, 64-bit versions are more common than 32-bit. When you are using 64-bit versions of Windows, ALL of your hardware device drivers must be 64-bit as well. Compatibility mode still works great, but if you have really old hardware, you probably are going to run out of support sooner rather than later. A tip with Windows 7 Professional or Ultimate versions: Check out XP Mode. This installs Microsoft Virtual PC and a full version of Windows XP Pro in a virtual machine environment. If your hardware can be seen through the virtual machine interface, then you may be able to install your old software in the 32-bit XP environment, and squeeze another year or two out of it. |
Tip #2: Application Volume Levels
Don't you just hate it when the commercials are louder than the movie? Well, even Windows Media Center can't help with that, but Vista does give you a way to "preset" the volume level of individual applications that play sounds. Open the application you want to adjust the default volume level for, and then click on the speaker icon down in the system tray (you can also right click and select "Open Volume Mixer" - which is the default action to a left click.) You should see the master "Device" volume on the left, and one or more "Applications" volume controls on the right. A thin line running across the control shows the application level relative to the Device master level, and will bump the master level up if you try to increase any of the application controls higher. The advantage is that you can set the volume of a game or the Media Center volume up high, but play Windows Sounds, like new mail dings or other notifications at a reduced volume. You can even turn the sounds in your favorite mini-game off, to keep the people around you thinking that you are still working on that business plan.
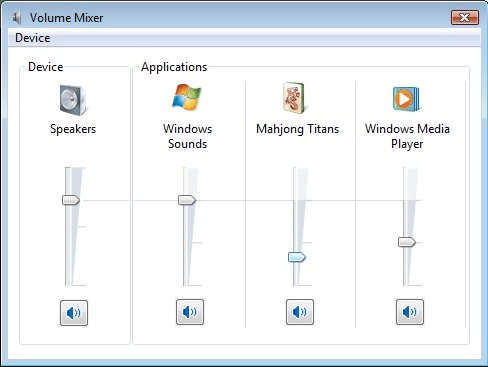
You can adjust the volume level of individual applications under Windows Vista
or Windows 7. The application must be running before it will appear in the mixer
control.
Tip #3: Auto Logon
One thing that drove me nuts with Vista was that I always had to log in to my home computer, which no one else was going to be using or have access to. This is really a security feature, just like asking for a login after the system exits standby or quits a Screen Saver. If you really enjoy logging in multiple times during the day, or have problems with other people messing with your computer when you step away, then you might want all of these features enabled. On the other hand, my computer is at home; I am the only one that ever uses it; the computer is on 24/7 and even has an oversize UPS to keep things running for hours during a power failure. If the computer does reboot, either due to a power loss or to something like Windows Updates, then I want the system to return to the desktop, and to launch any of my default programs like the X-10 light control, email, and most important - my Media Center DVR feature. Granted some things might still run and work fine even when sitting at the login screen, but after all, it's the principle of the thing. To enable the auto-login feature, do the following:
- Click on Start and go to Run. (If run does not appear, right click on the start button and select properties. Click "Customize" and scroll down to "Run command" and add a checkmark to the box. Click OK to save your change.)
- Type netplwiz and click OK.
- Click OK to allow the application to run. (User Account Control)
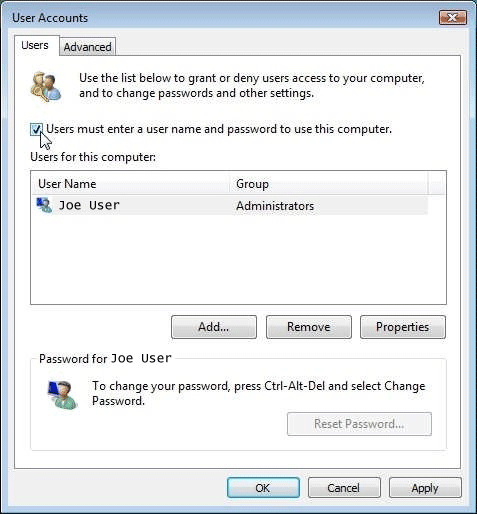
- Uncheck the box at the top that says "Users must enter a user name and password to use this computer."
- Click OK.
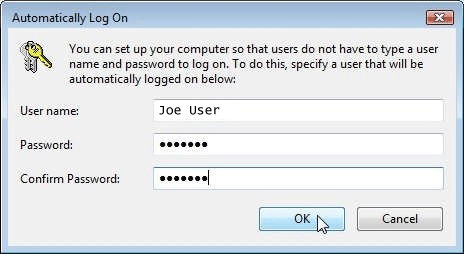
- An "Automatically log on" window will open. Type the user name that you want to automatically log into and type the password in twice (once in the password field and once in the confirm password field).
- Click OK.
- The changes will take effect on the next reboot.
Tip #4: Select files with checkboxes
Yes, you can select a file and while holding the shift key, click on another file to select all files in between. Or you can hold the control key down and click on one file or select a couple of files at a time, or, you can just mouse click on a checkbox in Vista or Windows 7.
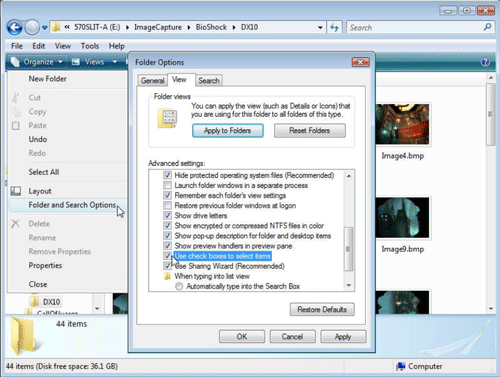
To use check boxes to make selections, do the following: In the folder view window, click on "Organize" and select "Folder Options". Click on the "View" tab, and then scroll down the list until you find "Use check boxes to select items". Add a checkmark in the box and click OK. I find this really handy when selecting a batch of files in a directory to rename, copy, move, or delete.
A "side effect" is that it also adds check boxes to other things like desktop shortcuts. It makes sense, since you might select one or more of these objects for similar reasons, but I still find it weird when you click on one.
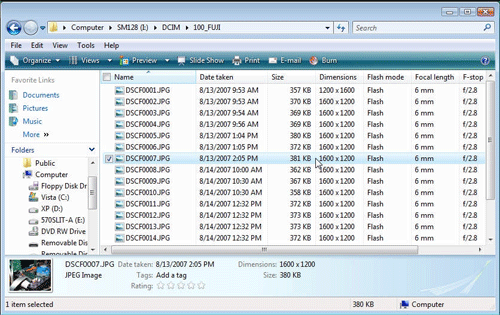
Tip #5: Even More File Details
When viewing a folder in "Detail view", you can right click on the header bar and select "More..." to see a list of all the different details that are possible to show. It doesn't mean that all of your files will have this data, but you might be surprised what does exist, especially in things like media files. Even under Windows XP, the amount of camera information stored in the individual image files is impressive - I count 38 possible options in XP's file detail list. If I counted right, Vista expands the supported metadata offering to at least 267 detail fields, many which are unique to specific file types like email, video, audio, etc. With that many new fields to choose from, the easiest way to see if there is additional detail to view, is to right click on one of your files and select "properties" from the context menu. Click on the "Details" tab and scroll through the list to identify the field names containing data.
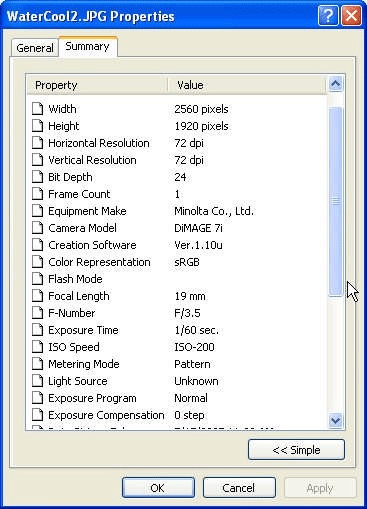
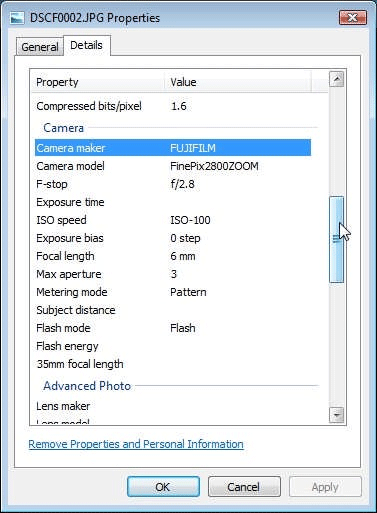
Digital Camera image file details under XP and under Vista - different cameras
will store different amounts of metadata detail in the file header.
Tip #6: Quick-Launch Hot Keys
Windows Vista still has the Quick Launch tool bar located next to the start menu. Just as with earlier versions of Windows, you can drag your own shortcuts to the toolbar to make frequently used programs launch with a single click. What is different with Vista is that the icons in the Quick Launch toolbar now have an automatic "Hot Key" assigned for a quick keyboard launch. When you tap the "Windows" key on the keyboard, the start menu normally opens, however, if you press the Windows key along with one of the number keys (1, 2, 3...8, 9, 0), it will start a Quick Launch application instead. The number used for the application is simply the order it appears on your Quick Launch bar. Press and hold the Windows key and then press 1 to launch the first icon, 2 for the second, 3 for the third, and so on.
These seem to work even when the Quick Launch toolbar is not visible such as when in a game, full screen view of a program, or have the Quick Launch menu bar "collapsed". In addition to the number keys for the Quick Launch, there are some additional key combinations available:
- Windows - D Display the desktop (hide or show open windows)
- Windows - E Open a "Computer" window showing your drives, etc.
- Windows - F Open a Find (search) window
- Windows - L Log Off the computer to the Welcome screen.
- Windows - M Minimize all open windows
- Windows - R Open the Start Menu Run Command, even if is not configured to appear on your start menu.
- Windows - U Open the Windows Ease of Access Center (User Access) with settings for magnifier, text- to speech narration, on-screen keyboard and high contrast viewing schemes.
- Windows - spacebar Display the Windows Vista Sidebar
- Windows - break Open the system properties window.
Note: Under Windows 7, the Windows key + a number key selects the first, second, third... application that is currently open, not the QuickLaunch item. The Windows-letter combinations do work.
Win7 Tip: Windows 7 does not have the QuickLaunch toolbar by default, however you can still add your own custom toolbars, and therefor can bring this back. First, make sure that your Folder and Search options are set to see Hidden Files and Folders. To add the QuickLaunch bar in Windows 7, right click on the taskbar, select "Toolbars" and then click on "New toolbar...". Navigate to C:\Users\[your_name]\AppData\Roaming\Microsoft\Internet Explorer and select the "Quick Launch" folder. Click the "Select Folder" button to create the toolbar. (If your toolbars are "locked" right click on the taskbar and click on "Lock the taskbar" to remove the check. Right click on your new QuickLaunch toolbar (usually in the bottom right) and remove the check mark next to "Show Text" and remove the one next to "Show Title". Move the QuickLaunch bar to the middle of the taskbar and then drag the main taskbar to the right side, until the QuickLaunch bar pops over to the Start Menu side. Position and adjust as necessary and then Lock your taskbar again to finish.
Tip #7: Windows Explorer Menu Bar
The Menu Bar (File, Edit, View, etc.) is hidden by default in Vista. You can make it appear by tapping the "Alt" key once. Tap it again and the menu goes away. If you want it displayed all of the time, Click Organize, Layout, and select "Menu Bar" to toggle it on or off.
Tip #8: Windows Snipping Tool (Screenshot utility)
You can find the new Snipping Tool buried in the Accessories section of the Vista Menus (Start, Programs, Accessories, Snipping Tool). If you right click on the icon and drag it to your Quick Launch toolbar, you can quickly access it using the [Windows] #key trick mentioned earlier. The Snipping tool won't work for capturing video shots and a couple of other things, but for screen shots of the desktop, an application window, or part of your screen to grab most still images, it works just fine.
Tip #9: Open Command Window Here
In Windows XP, this feature could be installed as one of the XP Power Toys. Under Vista, it's built in, but not visible when you just right click on a drive or folder location. To see the option, hold the shift key down before right-clicking on your target. If you want to have the option available all of the time (without shift-clicking), it takes adding a couple of keys to your registry. (This does not turn the option on, it actually adds a new option to the context menu in XP or Vista. If you press the shift key after the change, you should see two choices to "Open a Command Window".) For the registry change:
- Start, run regedit
- locate the key: HKEY_LOCAL_MACHINE\Software\Classes\Folder \shell
- in the right window, right click and select New->Key
- name the key "CommandPrompt"
- double click on the "default" entry in the right window and change the value to "Open a Command Window Here"
- Select the new CommandPrompt key
- in the right window, right click and select New->Key
- name the key "Command"
- double click on the "default" entry in the right window and change the value to "cmd.exe /k pushd %L"
- Exit the registry editor.
If everything is correct, you should have a new option in your right-click context menu when exploring your computer drives or folders.
Tip #10: Mouse Wheel Zoom
In Microsoft Office applications, one thing I use fairly often is the [Control]-[Mouse Wheel] combination to change the zoom view. Microsoft added this one into the Vista Explorer environment, and it works to resize your Windows desktop icons as well as the folder or file view when exploring a drive or directory. In the directory view, it actually "scrolls" through the different "view as" options as well as changing the size of the icons in the window.
Technical Support Community
Free technical support is available for your desktops, laptops, printers, software usage and more, via our new community forum, where our tech support staff, or the Micro Center Community will be happy to answer your questions online.
Forums
Ask questions and get answers from our technical support team or our community.
PC Builds
Help in Choosing Parts
Troubleshooting