Breadcrumbs
How to configure a RAID Volume on an Intel Motherboard
Description: This guide will show you how to create a RAID volume on an Intel motherboard. Most Intel motherboards will support RAID 0 or RAID 1. RAID, or Redundant Array of Inexpensive/Independent Disks is a technology that provides storage reliability through redundancy, combining multiple hard disk drives in to one logical unit wherein data is stored in multiple copies across multiple hard drives.
There are many types of RAID but the two most common are RAID 1 and RAID 0. RAID 1 is a duplicate drive, essentially Drives 1 and 2 will be exactly the same. This is done so that if either of the two drives fail, an exact copy of that drive is readily available.
Example:
Drive 1: File A, File B, File C, et cetera.
Drive 2: File A, File B, File C, et cetera.
RAID 0 is in fact not really RAID at all because it is not redundant. RAID 0 splits a file in to pieces and puts some of the pieces on Drive 1 and some on Drive 2, to increase speed. The theory is that if Drive 1 reads the first part of File A, and Drive 2 reads the second part of File A, the information is actually read twice as fast and thus the computer is twice as fast. The major downside is that this actually doubles your susceptibility to hardware failures as if one drives fails, all of the information is lost.
- Make sure two hard drives are connected to the motherboard and are connected to the power supply.
- Enter the standard BIOS by pressing the F2 key repeatedly on POST.
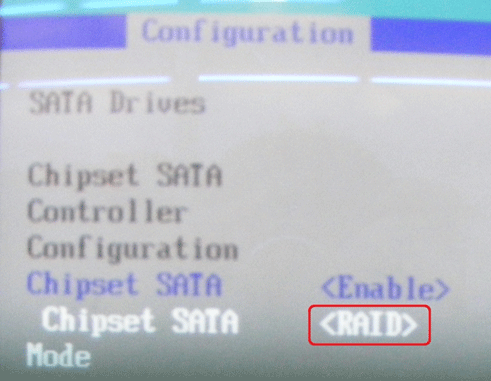
- Once in the BIOS go to the Configuration tab, then select SATA Drives.

- Within the SATA Drives heading set the Chipset SATA Mode to <RAID>

- Save changes and Exit.
- After the settings have been saved, power down the machine.
- Power on the machine and immediately begin tapping the Ctrl key and the I key repeatedly. This will access the RAID BIOS.
- The RAID BIOS will show both drives connected to the system. In this menu select Create RAID Volume.

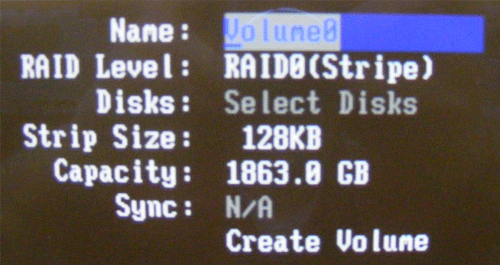
- Select a Name for the volume and press the Tab key.

- Select the RAID type (0 or 1) using the up or down arrow keys and press Tab again.

- Press the Tab key through the rest of the options until you get to the Create Volume option and press the Enter key.

- A data loss warning will appear when creating a new volume: All data will be lost on both drives. Press the Y key to create the RAID volume.

- The two drives will show in a RAID once this is complete. Press ESC then Y to Exit the RAID BIOS then install your operating system on your drives which are now in RAID.

Technical Support Community
Free technical support is available for your desktops, laptops, printers, software usage and more, via our new community forum, where our tech support staff, or the Micro Center Community will be happy to answer your questions online.
Forums
Ask questions and get answers from our technical support team or our community.
PC Builds
Help in Choosing Parts
Troubleshooting
