Breadcrumbs
How to safely remove USB Storage Devices in Windows 7
Description: This is a how-to article for Windows 7 on the topic of safely removing USB storage devices such as flash drives or external hard drives.
- Close out of all windows and programs that may be using the device.
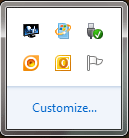
- In the System Tray, in the bottom right corner of the screen, click on the arrow pointing up to show more icons, seen highlighted here.

- Look for the Safely Remove Hardware icon on the new window, shown in the top right here.

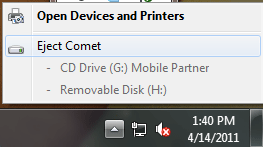
- Right-click on the Safely Remove Hardware icon and choose Eject [Name of Drive]. Shown here as Eject Comet, as the name of the USB storage devices is Comet.

- A message will appear stating that it is safe to remove the hardware.

- If that message does not appear, close out of any open programs and try again. If it still fails, restart the computer.
Technical Support Community
Free technical support is available for your desktops, laptops, printers, software usage and more, via our new community forum, where our tech support staff, or the Micro Center Community will be happy to answer your questions online.
Forums
Ask questions and get answers from our technical support team or our community.
PC Builds
Help in Choosing Parts
Troubleshooting
