Breadcrumbs
How to perform Recovery from HP Recovery Disks
Description: Perform the following steps to recover your HP computer using a set of factory recovery discs (either CDs or DVDs). These discs can be a set that was received from HP Support or discs that you created using the tools provided with your HP computer.
- Turn the computer on and insert the first recovery disk into the drive.
- Press and hold the power button to turn the computer off.
- Disconnect all connected devices and cables such as Personal Media Drives, USB drives, printers and faxes. Remove media from internal drives, and remove any recently added internal hardware. Do not disconnect the monitor, keyboard, mouse, or power cord.
- Turn the computer on.
- Immediately press the escape key repeatedly, about once every second, until a Startup Menu or Select boot device menu opens.
- The selections you need to make vary slightly depending on the type of menu that appears on your screen:
- If a select boot device menu displays, use the up or down arrow key to select the CD/DVD drive, and then press enter to continue.
- If a startup menu opens, press F9 to open Boot Menu or Boot Device Options. Use the up or down arrow key to select the CD/DVD drive. Then press enter.
- A window might appear and prompt you to choose whether to run Recovery Manager from the hard disk or from the disk inserted. If this window displays, select the Run program from disc, and then click Next.
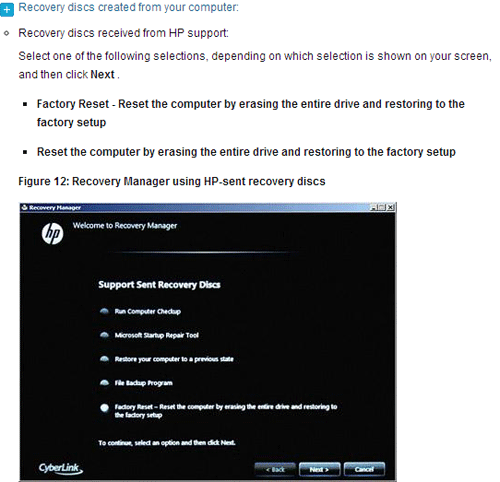
- Select an option based on the type of recovery discs that you have.

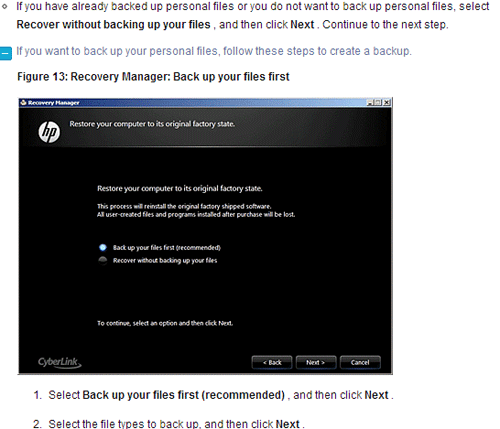
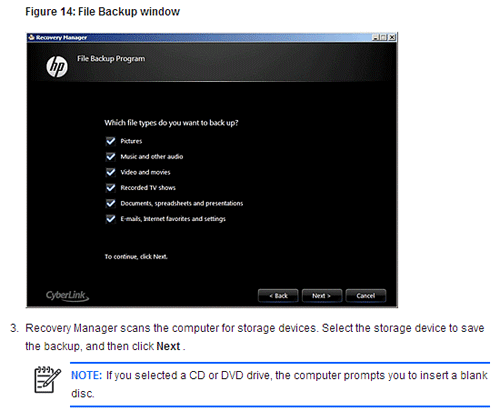
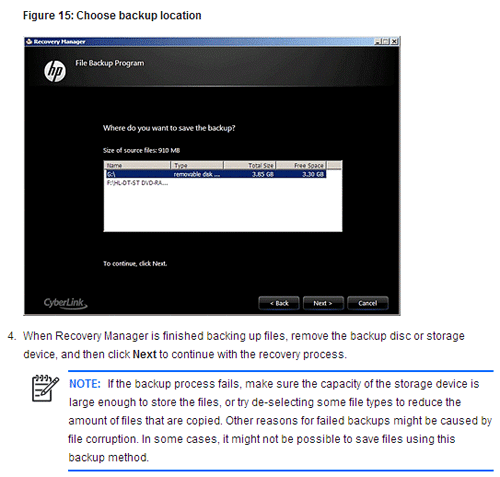
- When System recovery prompts you to back up your files, select a backup option:


- Click OK in the warning that appears.
- Read and respond to the screens as they appear. If a screen prompts for a disc, insert the next disc. In some cases, you might have to repeatedly insert the same discs multiple times before the screen allows you to continue.
- After system recovery is complete, remove the disc. If the tray does not eject the disc, press the eject button on the PC case to eject the disc.
- If you are presented with a "Restoration Complete" screen, click Finish. If you are presented with a "File copy is complete", screen, click Next.
- Depending on which model of computer you have, the computer will either shut off or restart. If the computer shuts off, wait 5 seconds and turn on the computer.

- Complete windows setup when the screen appears.
- Once windows setup has been completed, shut the computer down, reconnect all devices and cables, and then turn the computer on.
- Before using the computer, update and protect your computer. Reinstall any anti-virus and security software that was installed before the system recovery as well as any factory updates to the system software.
- Reinstall any software programs that were added after purchasing the computer, as well as any files that were backed up.
Technical Support Community
Free technical support is available for your desktops, laptops, printers, software usage and more, via our new community forum, where our tech support staff, or the Micro Center Community will be happy to answer your questions online.
Forums
Ask questions and get answers from our technical support team or our community.
PC Builds
Help in Choosing Parts
Troubleshooting
