
How to customize the Start Menu in Windows 7
Description: How to customize the Start Menu links, icons, and menus.
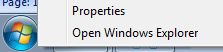
- Right-click on the Windows Start button to bring up a menu that has Properties and Open Windows Explorer as options.

- On this menu, select properties by clicking the mouse.
- The start menu properties window will be displayed. Within the start menu properties, click on the icon that says customize.

- Within the start menu customization settings, you can change which icons show up on the right side of the start menu. Icons can be displayed as a link, a menu, or not displayed at all.

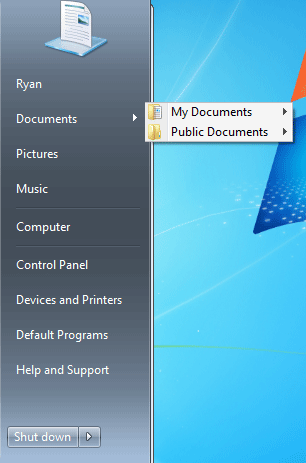
- If you choose to display an icon as a link, the specific folder will open in a new explorer window when clicking on it in the start menu. If you choose to display the icon as a menu then it will bring up a menu to the side as shown below.
- After you have selected how you want your start menu to look, click OK to close the customization window and then Apply and OK on the start menu properties window to save the changes.
Technical Support Community
Free technical support is available for your desktops, laptops, printers, software usage and more, via our new community forum, where our tech support staff, or the Micro Center Community will be happy to answer your questions online.
Forums
Ask questions and get answers from our technical support team or our community.
PC Builds
Help in Choosing Parts
Troubleshooting