
How to troubleshoot a Newly Built PC that will not POST
Description: This article will show you how to troubleshoot a newly built computer system that will not turn on, or power cycles on and off, or will not display anything on your monitor.
- Always begin with having read and understood all of the manufacturer guides before attempting to build your computer. If you run into problems along the way, manufacturer documentation is a great source of information that is specific to that product.
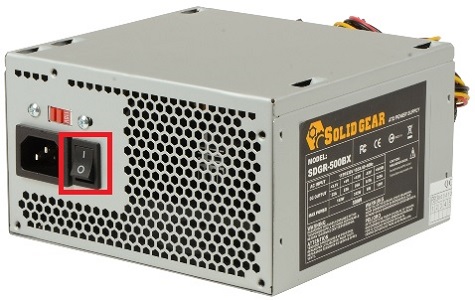
- Check to be sure your power supply switch is turned to the proper setting in the ON position. It should be set to the line, not the circle.
- If you have a video card, check to be sure your monitor is plugged directly into it and not into the motherboard video ports. The dedicated video card ports are normally located below the audio ports, towards the bottom of an upright case. Verify the monitor is set to the proper input based on your connection type: HDMI, VGA, etc.

- Test your monitor with another device or test another monitor with the computer to eliminate your monitor as the source of the problem.
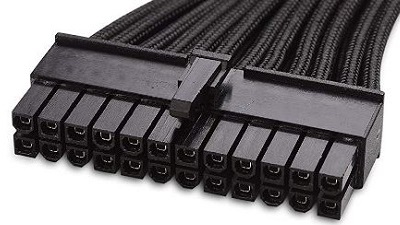
- Check to be sure both your motherboard power cable and your CPU power cable are plugged in.

- Verify that your RAM is seated properly. If you are using more than one stick, verify that they are installed in the correct slots according to your motherboard user manual.
- Try booting with a single stick of RAM at a time to see if this makes a difference. Try each stick in different slots to narrow down whether it might be an individual stick or a slot on the motherboard.
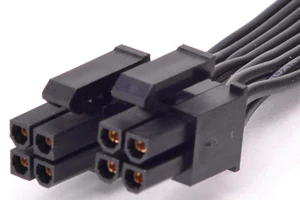
- Confirm that your video card is seated properly and the 6 pin or 6+2 pin PCIe power connectors are plugged in properly from your power supply if the video card requires them.


- If your CPU has integrated graphics, try booting without the video card installed on the board and using your motherboard video ports instead of the card to see if this makes a difference.
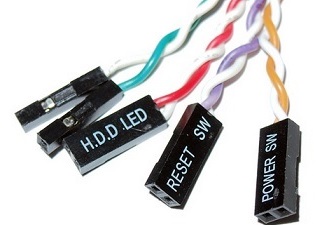
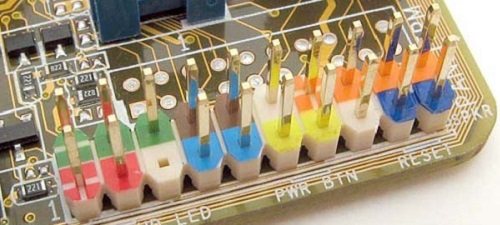
- Check to make sure that your front panel connector cables are connected properly to the pins on your front panel header on your motherboard. Different boards may have different pin layouts so make to check your user manual. If they appear to be correct and it still will not power on, try jumping the power switch pins on your motherboard by gently touching the two of them together with the metal end of a screwdriver - this can validate if the switch is having a problem.
- Confirm that your CPU fan cable is plugged in.
- Check to be sure there is no thermal paste running down the sides or underneath the CPU. You only need a small amount of thermal paste to cover your whole CPU when installing a new cooler.
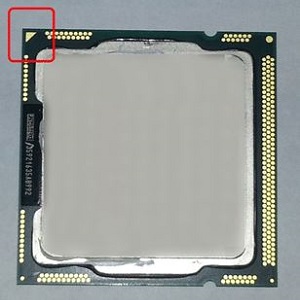
- Confirm that your CPU is facing the right direction in the socket? Look for tabs or an arrow that matches to your motherboard showing you which corner lines up where so that the CPU is in the correct position.

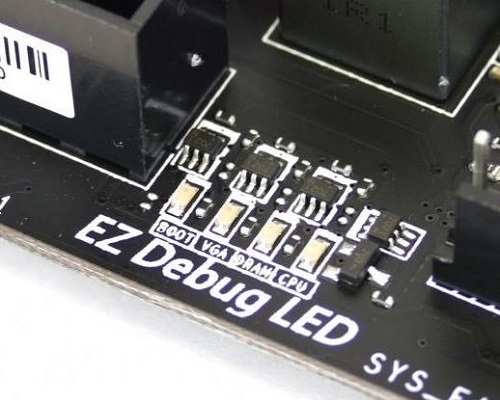
- Does your motherboard have any error code or debug LEDs that are lighting up? Some motherboards will have lights that can indicate if it is detecting an error with one of your components. This can potentially indicate a hardware problem. Try unplugging and replugging that component and make sure it is snug in its socket.
- Clear your CMOS. This can be done either by removing the button cell battery on the board while the power cable is unplugged from the back or by using the clear CMOS jumper on your motherboard. Instructions are in your motherboard user manual on where to find the jumper.
- Check for any bent pins on your motherboard or processor.
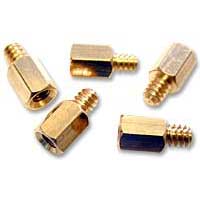
- Confirm that your motherboard standoff screws were installed properly. These screw directly into your case and sit under the board to mount it. Some cases come with preinstalled motherboard standoffs - if one is in a place that does not line up with a corresponding hole on the motherboard ad short could happen. Also make sure that there are no wires or loose screws or objects underneath the motherboard.
- Does your motherboard require a BIOS update for your processor? If your CPU is newer than your motherboard, the BIOS may need to be updated first to make them compatible with each other. An older processor that is compatible will need to be used to update it to the correct version.
- Is your RAM compatible with your motherboard? Most RAM is compatible with most motherboards if it has the right socket and the motherboard supports the capacity of the module that is installed, but in rare cases you can have an issue. Your motherboard manufacturer will have a qualified vendor list of RAM that they have tested to be compatible with your model on the manufacturers support page for your motherboard. If your RAM is not on the list, try switching to one that is.
- Check if your motherboard might be shorting out inside the case. Take the motherboard out and put it on a flat insulated surface such as cardboard or wood. Do NOT put your motherboard on an anti static bag or anything else that could conduct electricity - this can ruin your components. Install your CPU, RAM, and video card if you have one, then hook up your power supply and try to get it to boot by jumping the power switch pins on your board. This is called breadboarding. If it boots up while you have it breadboarded, your case could be making contact with the board somewhere it should not be and shorting it out.
- Finally, if troubleshooting does not identify the problem and corresponding solution, you may require assistance offered by the Micro Center In Store Service Department.
Technical Support Community
Free technical support is available for your desktops, laptops, printers, software usage and more, via our new community forum, where our tech support staff, or the Micro Center Community will be happy to answer your questions online.
Forums
Ask questions and get answers from our technical support team or our community.
PC Builds
Help in Choosing Parts
Troubleshooting