Arduino Workshop - Project 05: Push-On, Push-Off - Part 2


Hardware Required:

  • Arduino Uno board
  • LED (x2)
  • 330 ohm (x2), 10 K ohm resistors
  • Pushbutton switch (N.O.)
  • jumper wires

    Hardware Required

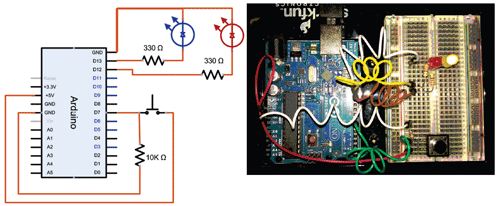
Schematic:


Project Steps:

  1. Assemble an LED and pushbutton, following the directions for project 4.
    Add a second LED:
  2. Insert a second LED in the breadboard
  3. Connect a wire between the ground and the short pin of the second LED
  4. Connect a 330 ohm resistor between the D12 on the Arduino and the long-leg of the LED Change the program to turn LED2 on when LED1 is off, etc..
    • Save a copy of the Project4 code as a Project4b (file, save-as, enter new name)
    • Change all of the "LED" variables to "LED1"
    • Copy each line containing "LED1" and paste as a new line immediately following it.
    • Change "LED1" in each of the duplicate lines to "LED2", for example:
      const int LED1 = 13;
      const int LED2 = 13;
    • Change the Digital Output used for LED2 to 12 (const int LED2 = 12;)
    • Change the lines that turn LED2 on and off to the opposite of what LED1 has:
      digitalWrite(LED1, HIGH);
      digitalWrite(LED2, LOW);
    • Verify your code and upload to the Arduino.

Technical Support Community

Free technical support is available for your desktops, laptops, printers, software usage and more, via our new community forum, where our tech support staff, or the Micro Center Community will be happy to answer your questions online.

Forums

Ask questions and get answers from our technical support team or our community.
PC Builds
Help in Choosing Parts
Troubleshooting

Knowledge Base

Helpful articles written by Micro Center Experts.
ESET
Windows

Sign in for the best experience

Access helpful features and personalize your experience - Sign in or create an account now

Sign In
Don't have an account? Create Account