
How to customize Ribbons in Excel 2013
Description: This tutorial will show how to change the order of the ribbons and other customization options for Excel 2013.
- Open Excel 2013.

- Open up any spreadsheet, or create a new one.
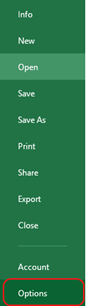
- Once the new spreadsheet is open, click File at the top left.

- Then click Options at the lower left.
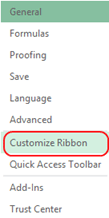
- This will bring up a new window with a number of options. Click on Customize Ribbon.
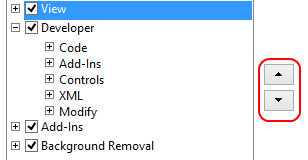
- In the right column there are two arrows. Once a tab is selected, click the arrow up or down to change the order the tab will show up in the main ribbon of Excel. For example: Click on View.
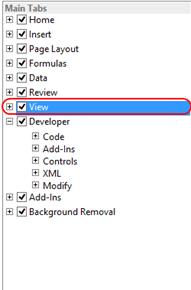
- Then the arrows for up and down will be clickable. Choose either up or down to change the order of View in relation to the other tabs.
- Click OK. Once the window is closed, view will have changed its position in relation to where it was before.
Technical Support Community
Free technical support is available for your desktops, laptops, printers, software usage and more, via our new community forum, where our tech support staff, or the Micro Center Community will be happy to answer your questions online.
Forums
Ask questions and get answers from our technical support team or our community.
PC Builds
Help in Choosing Parts
Troubleshooting