
How to clean the Windows HOSTS file if Malware has Tampered with it
Viruses attack computers not just by posting pop-up ads for phony software. They also cripple the computer's basic functions so that the virus is difficult to get rid of. One of the chief objectives of viruses is to prevent internet browsers from going to web sites chosen by the user. There are several ways that viruses steer a browser away from its intended destination. Sometimes they install a Proxy Server into the web browser (See Part 3 in this series How to clear the Proxy Server Setting). At other times a virus will insert unwanted IP addresses into the network settings (See Part 4 in this series, How to reset Static IP addresses to dynamic IP addresses). A third way that viruses hijack internet connections is rarer, but it does happen. If previous attempts at solving the problem do not work, it is worth investigating a Windows feature called the HOSTS file.
The Windows HOSTS file serves to map user-friendly and familiar web site addresses (such as Google) to the actual IP addresses that are behind such names (such as 216.239.51.99). The HOSTS file is sometimes used by network administrators for managing fixed networks. Unfortunately, it is also a target for viruses that want to hijack a computer's internet connectivity. Fortunately, if the HOSTS file has been attacked and unwanted material written into it, the file can be manually cleaned.
The HOSTS file is located deep in the Windows folder. It is not easy to find, but following these steps will help you locate it, inspect it and-if necessary-clean it up.
First, you need to open up the Windows text editor called Notepad. Depending on which version of Windows you have, this is done differently:
In Windows 7:
- Click on the Start button
- Type notepad in the search box
- Right click the Notepad program in the list
- Click Run as administrator in the drop-down menu
- Click Yes to allow the program to make changes (if this option appears on the screen)
In Windows 8:
- Open the Charms menu and click on the Search Charm
- Type “notepad” in the Apps search window
- Right-click the program Notepad that appears in the results in the upper left corner
- In the taskbar that opens at the bottom of the screen, click Run as administrator
- Click Yes to allow the program to make changes (if this option appears on the screen)
When notepad is opened up, you will see a new window for the Notepad text editor that looks like this:

With the Notepad application open click on File in the menu bar, then click on Open in the drop-down menu (as indicated by the red arrow, above).
To locate the HOSTS file, start with a double click on the C drive in the left panel, then the Windows folder, the System32 folder, the drivers folder, and finally the etc folder. Once the etc folder is open, click on Text documents (*.txt) and drop down to the next option which is All files (*.*). If you are in the correct folder, you will see a list of 3 to 5 files in the window, as shown below. Now, double-click the HOSTS file (circled) to open it up in the text editor.

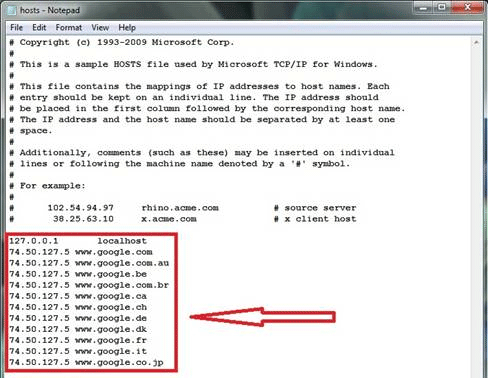
The example below is of an actual hijacked HOSTS file. All the lines of text that are preceded by the # sign are legitimate (comments). All the others were inserted by a virus to steer users in various countries to the unintended IP address of 74.50.127.5 (the web site designed by the virus author) instead of Google.
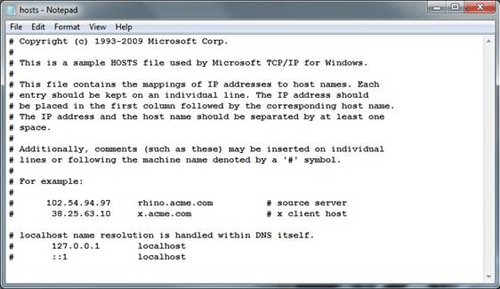
To remove the intruding instructions in the host file is simply a matter of deleting the lines that are not wanted. Using Notepad, move the cursor to the area (as highlighted, above) and delete those lines, leaving the original lines in the HOSTS file. A clean HOSTS file will look something like this:
When finished editing, simply save the file, reboot the computer, and try to use your browser normally. Hopefully, the experience of being steered away from desired web sites will be gone, and you will be able to browse freely.
Technical Support Community
Free technical support is available for your desktops, laptops, printers, software usage and more, via our new community forum, where our tech support staff, or the Micro Center Community will be happy to answer your questions online.
Forums
Ask questions and get answers from our technical support team or our community.
PC Builds
Help in Choosing Parts
Troubleshooting