Breadcrumbs
How to set up a Guest Network on a Tenda N60 Router
Description: This technical article will show how to configure the N60 router to provide a guest network for visitors so they can access internet without being able to see other connected computers.
- First, we need to access the router's configuration page. This can be done by opening an internet browser window. Next, enter 192.168.0.1 into the address bar at the top.
- Log in to the router. The default login is admin as both the username and password unless you have changed it.
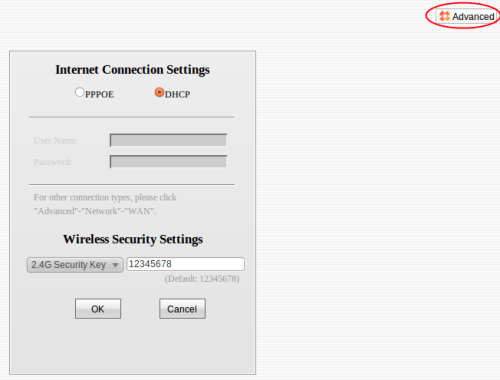
- Once logged in the main screen, shown below, will appear. Click on Advanced in the upper right.

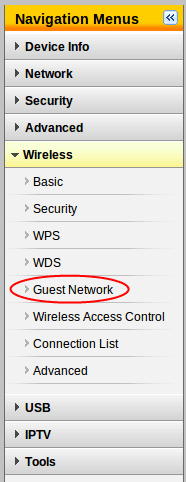
- Open the Wireless menu and click on Guest Network.

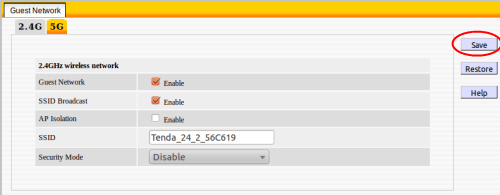
- The guest network is disabled by default. In order to set it up, first check the Enable box on the Guest Network screen. Note that there are two guest networks that can be configured on this router. One operates at the 2.4 GHz frequency, while the other operates at 5 GHz. In this example, we will setup the 2.4 GHz network.

- Once the Enable box is checked, more options will appear. One of these options is SSID Broadcast, which will allow the network to be seen when a computer scans for available networks. Another is AP Isolation, which will prevent computers connected to the guest network from seeing each other. This will prevent any unwanted computer access from other users on the network. Finally, there are the SSID and the Security Mode. The SSID is the name of the network, which can be set to anything, and the security mode will determine what protocol is used for security of the network. If a password is desired, WPA-PSK, WPA2-PSK, or Mixed WPA/WPA2-PSK should be used. If a password is not desired, the security mode may be set to either Disabled or Open. Shared is not recommended unless older devices that do not support WPA are being used, as it can be less secure than the WPA standards. Once the settings have been decided upon, click on the Save button in the upper right.

- The 2.4 GHz guest network is now configured and ready for use. To connect to it, simply find the SSID in the list of available networks and enter the password (if one was setup). If the SSID Broadcast option was disabled, then it will be necessary to manually connect to the network instead of scanning for available networks.
Technical Support Community
Free technical support is available for your desktops, laptops, printers, software usage and more, via our new community forum, where our tech support staff, or the Micro Center Community will be happy to answer your questions online.
Forums
Ask questions and get answers from our technical support team or our community.
PC Builds
Help in Choosing Parts
Troubleshooting
