
How to set up a New ASUS RT-AC68U Wireless Router
Description: This article will show how to complete the basic setup of an ASUS wireless router, including the physical connection and basic wireless setup. The steps and screenshots can be used for most ASUS wireless routers; however the location of physical connections may be different depending on your router’s model. The router being used in this guide is the ASUS RT-AC68U.
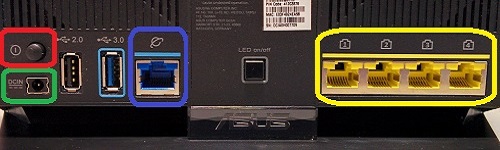
- There are 3 cables that will need to be connected:
- Connect an Ethernet cable from your cable/DSL modem to the WAN port on your ASUS router; labeled with a globe with a ring around it (this port is blue).
- Connect another Ethernet cable from your computer to any one of the LAN ports on the router; labeled 1, 2, 3, and 4 (these ports are yellow).
- Finally, connect the power cable to the wall outlet and to the DCIN port on the router (shown in green).
- Once everything is connected, press the power button on the back of the router (shown in red).
- Once the router is powered on, open a web browser. The ASUS setup page may automatically open. If so, continue to step 4 of this guide. If not, type 192.168.1.1 in the address bar and then press Enter.

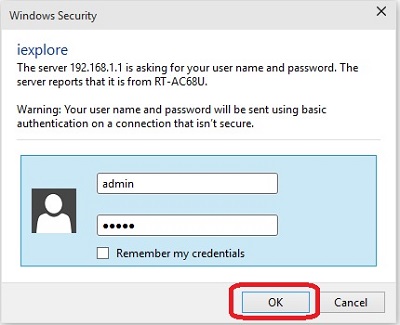
- If prompted to login to the router, enter admin as both the username and password, and then click OK.

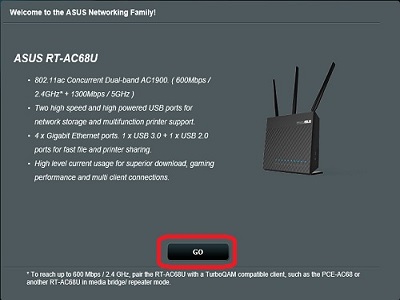
- The initial setup page will open, click the GO button.
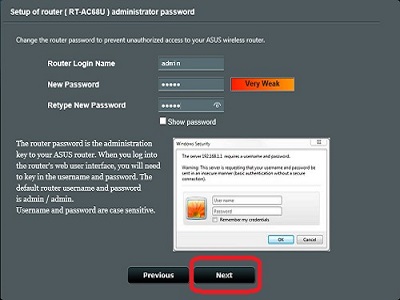
- Enter the desired username and password for the router administrator in the corresponding boxes, and then click Next. It is highly recommended to change this from the default username and password as this is the information that will be used to access the router’s administration settings.
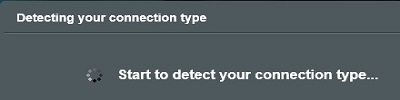
- The router will detect your internet connection. Depending on your connection type, additional details may need to be entered if required by your Internet Service Provider (ISP). In most cases, the router will detect the connection automatically and continue.
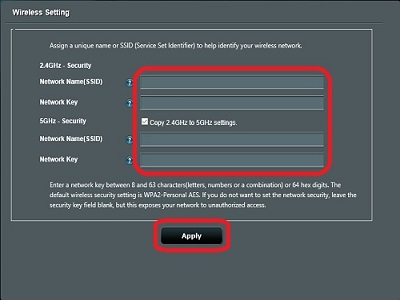
- Enter the desired network name (SSID) and network key (password) into the corresponding boxes, and then click Apply.
- A configuration summary will appear, showing the new settings. Click the Next button.

- A login prompt will appear. Enter the credentials that were entered earlier in step 5 and click OK.
- The settings page for the router will open. Click the Logout button at the top of the page to logout of the router’s settings.

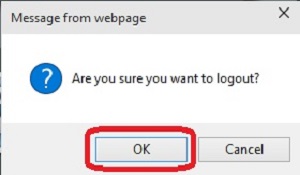
- Click OK on the confirmation box to logout. Setup is now complete.
Technical Support Community
Free technical support is available for your desktops, laptops, printers, software usage and more, via our new community forum, where our tech support staff, or the Micro Center Community will be happy to answer your questions online.
Forums
Ask questions and get answers from our technical support team or our community.
PC Builds
Help in Choosing Parts
Troubleshooting