
How to configure Quick Setup Options on a Tenda W301A Access Point
Description: This article will show how to use several of the Quick Setup options for the Tenda W301A access point.
NOTE: You may need to configure your computer with a static IP address first before proceeding. See this article for more information on that process.
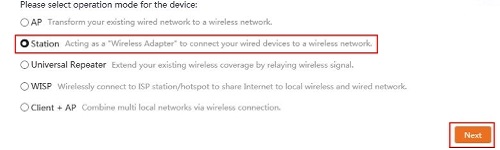
Access Point Quick Setup allows you to transform your existing wired network to a wireless network.
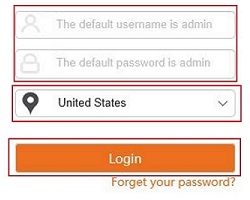
- Open up a web browser and type 192.168.0.254 into the address bar. Press enter.

- You will now be on the login page. The default user name and password is admin unless you have changed it. Select your country and then click Login.
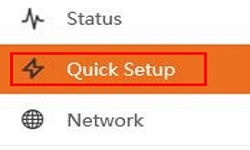
- Click Quick Setup.
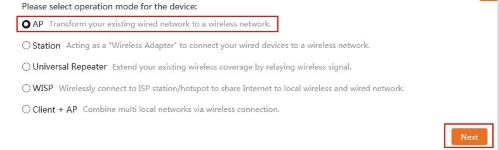
- Select AP and then click Next.
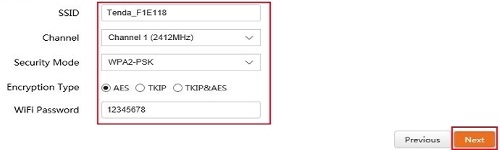
- Set up the wireless access point. It is recommended that you customize this setting, but you can choose to leave the default settings. Click Next.
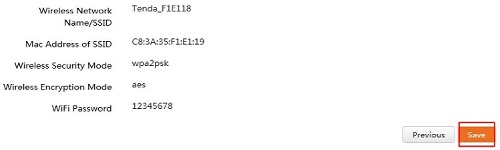
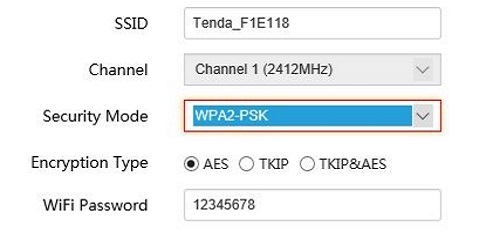
- SSID is the name of the network.
- Channel, Security, and Encryption should be left at default settings.
- The WiFi Password is what will be required for the client to enter when connecting to the network.
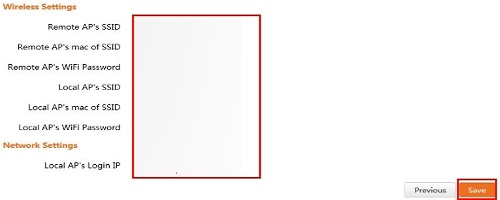
- An overview of your settings will display. Click Save.
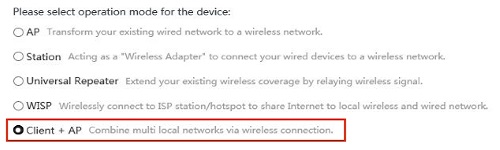
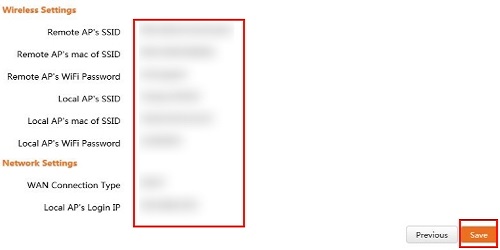
Client + Access Point Quick Setup combines multiple local networks via a wireless connection.
- Open up a web browser and type 192.168.0.254 into the address bar. Press enter.
- You will now be on the login page. The default user name and password is admin unless you have changed it. Select your country and then click Login.
- Click Quick Setup.
- Select Client + AP and then click Next.
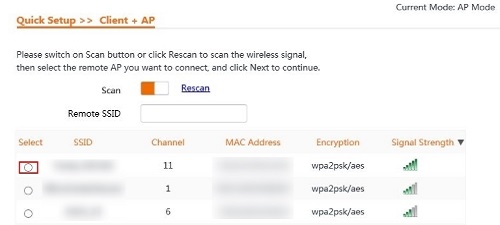
- Select the radio for the network you wish to connect to and click Next.
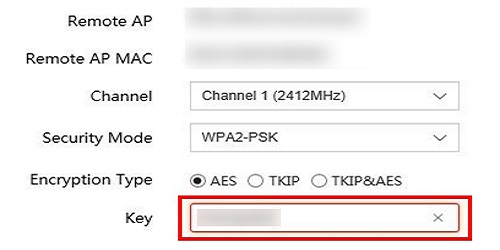
- Enter the password or key for the selected network in the key field and click Next.
- Configure the wireless network settings for the W301A access point. You can choose to customize these settings or leave the defaults. Click Next.
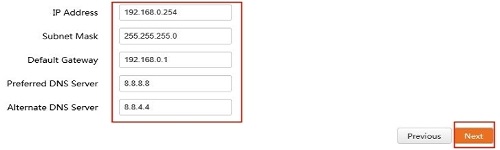
- Change the IP Address so that it is different than the remote access point but still in the same network segment. Click Next. Most routers are 192.168.1.1 or 192.168.0.1 so make sure the first three segments are the same and the last segment is different.
- An overview of your settings will display. Click Save.
Station Setup. Setting this access point as a station will turn it into a wireless adapter for a non-wireless computer.
- Open up a web browser and type 192.168.0.254 into the address bar. Press enter.
- You will now be on the login page. The default user name and password is admin unless you have changed it. Select your country and then click Login.
- Click Quick Setup.
- Select Station and then click Next.
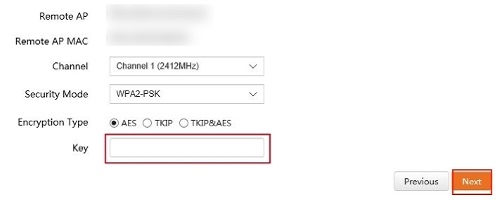
- Select the radio for the network you wish to connect to and click Next.

- Enter the password or key for the selected network in the key field and click Next.
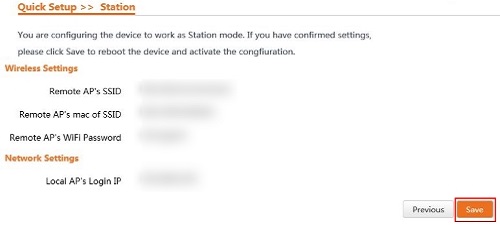
- Change the IP Address so that it is different than the remote access point but still in the same network segment. Click Next. Most routers are 192.168.1.1 or 192.168.0.1 so make sure the first three segments are the same and the last segment is different.
- Click Save.
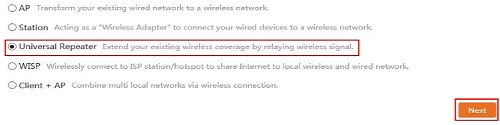
Universal Repeater Quick Setup will extend your existing wireless coverage by relaying your wireless signal.
- Open up a web browser and type 192.168.0.254 into the address bar. Press enter.
- You will now be on the login page. The default user name and password is admin unless you have changed it. Select your country and then click Login.
- Click Quick Setup.
- Select Universal Repeater and then click Next.
- Select the radio for the network you wish to connect to and click Next.
- Enter the password or key for the selected network in the key field and click Next.
- Change the IP Address so that it is different than the remote access point but still in the same network segment. Click Next. Most routers are 192.168.1.1 or 192.168.0.1 so make sure the first three segments are the same and the last segment is different.
- An overview of your settings will display. Click Save.
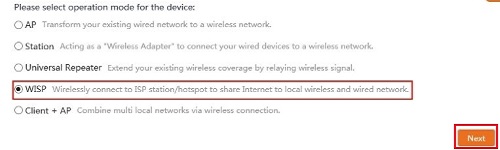
WISP Quick Setup can be useful when you do not have control over the remote network such as a public WiFi hotspot.
- Open up a web browser and type 192.168.0.254 into the address bar. Press enter.
- You will now be on the login page. The default user name and password is admin unless you have changed it. Select your country and then click Login.
- Click Quick Setup.
- Select WISP and then click Next.
- Select the radio for the network you wish to connect to and click Next.
- Enter the password or key for the selected network in the key field and click Next.
- Select the connection type for the network. Most of the time this will be DHCP. Check with your ISP or network administrator if there is a question here.

- Configure the wireless network settings for the W301A access point. You can choose to customize these settings or leave the defaults. Click Next.
- Change the IP Address so that it is different than the remote access point but still in the same network segment. Click Next. Most routers are 192.168.1.1 or 192.168.0.1 so make sure the first three segments are the same and the last segment is different.

- An overview of your settings will display. Click Save.
Technical Support Community
Free technical support is available for your desktops, laptops, printers, software usage and more, via our new community forum, where our tech support staff, or the Micro Center Community will be happy to answer your questions online.
Forums
Ask questions and get answers from our technical support team or our community.
PC Builds
Help in Choosing Parts
Troubleshooting