

Upgrading to Windows 10 - Disk Cleanup Utility
A normal result of upgrading your Windows Operating System in place is that you will find archives of your previous operating system still on your hard disk drive after the upgrade is complete. This is intentional by design in case there is a problem with the upgrade. These files give you an option to go back to your previous operating system, in most cases, with a simple click of the mouse. The downside of this feature is that it takes up space on your hard drive – several gigabytes of space. At some point in time, most people will want to recover this space on their drive – when you decide to do this varies by PC and by when you are comfortable enough to move on without the safety net. Let’s take a look:
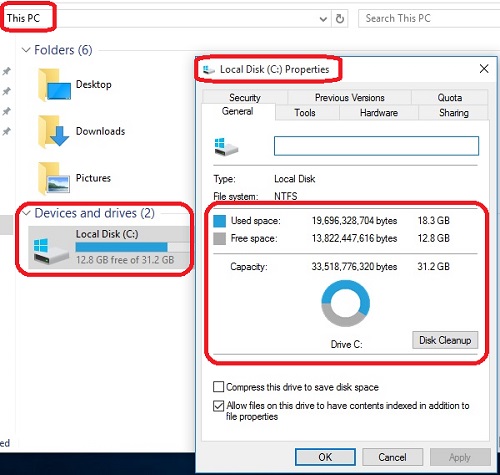
- Begin by bringing up Windows File Explorer on your screen. You can click on the shortcut on your taskbar (a little yellow folder) or you can type the words Windows File Explorer into the search box and press enter. When Windows File Explorer comes up, observe how much space is used and free on your C drive. Right click on the C drive and then choose properties to display additional information about the drive. At this stage, this is merely an observation. You can choose to make note of this information if you want to compare later with your end results. When you are ready to proceed, click on Disk Cleanup within the C drive properties window.
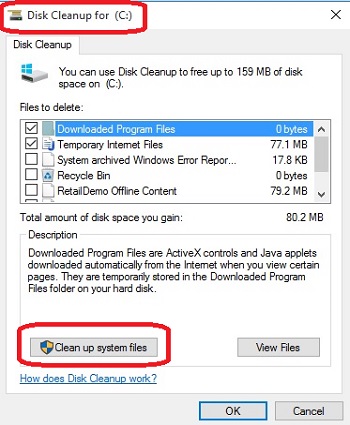
- When the Disk Cleanup utility first comes up, simply observe the information that is on the screen, then at the lower left of this window click on the button for Clean up system files.
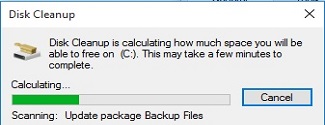
- A Disk Cleanup Calculating window will come up on the screen. For several seconds, Disk Cleanup will evaluate all of the options on your drive, and then will present you with a similar window to the one you saw first, but with more options.
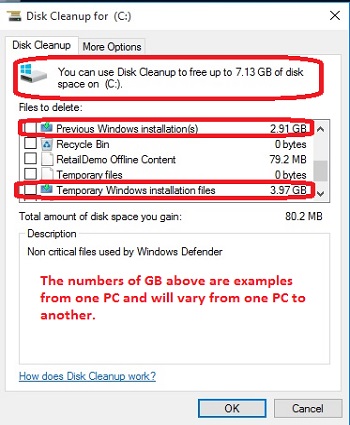
- When the Disk Cleanup window comes up for the second time, to include system files, this is where you will want to select what you want to clean up. If you click on each description (not its check box) there will be a brief description in the window below of what each choice represents. It is typically fine to check everything in this section, however some individuals may have a preference to keep one thing or another. There is no right or wrong choice here – simply what choice is best for your PC. Each choice corresponds with an amount of space that will be freed up on your C drive. Click to put a check mark in each box from the list that you want to clean up.
- Once you have made your selections, click on the OK button to proceed.

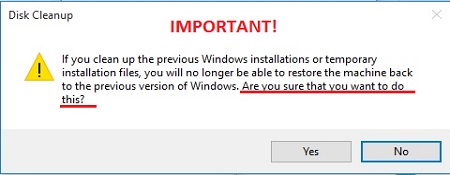
- You will be presented with a Final Warning before proceeding. This is to remind you that once you clean up the previous version of operating system files you will no longer be able to simply roll back to the previous version. The warning sounds ominous, because it is important, but there is no harm to do this if it is your intention to not roll back. (This message will NOT display during disk cleanup at other times when there is no previous operating system to cleanup.) Click on the Yes button when you are ready to proceed – or click on the No button if you have changed your mind.
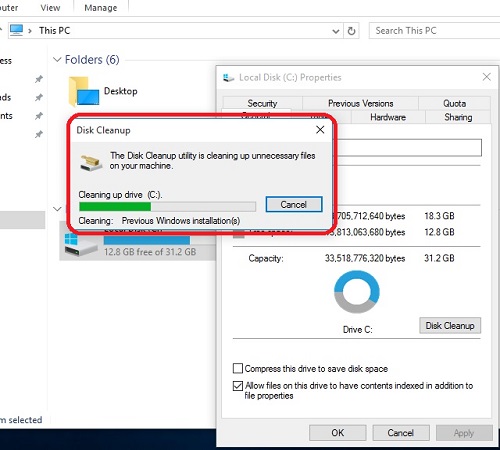
- A Disk Cleanup progress window will display on the screen. This may take several minutes to complete.
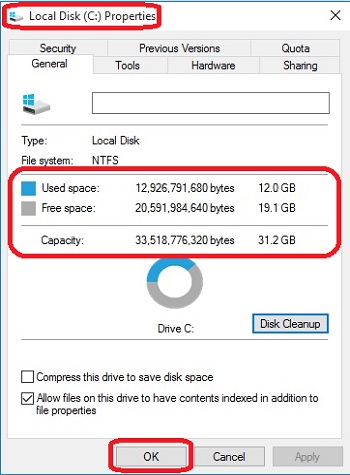
- When Disk Cleanup is finished the C drive properties window will again display on the screen. You can now compare your results with the original disk usage from step one if you desire. In this example, the PC gained about 7GB of free space – results will vary from one PC to another. Click the OK button when you are finished.
It is worth noting that the Disk Cleanup Utility can be run at any time. It is particularly useful after an in place upgrade has been done because there are many files left behind from that upgrade, but it is also useful from time to time as a routine maintenance step for any PC.
Technical Support Community
Free technical support is available for your desktops, laptops, printers, software usage and more, via our new community forum, where our tech support staff, or the Micro Center Community will be happy to answer your questions online.
Ask questions and get answers from our technical support team or our community.
PC Builds
Help in Choosing Parts
Troubleshooting