
How to use the Windows 7 Problem Steps Recorder
Problem Steps Recorder is used to automatically capture the steps to reproduce a problem, including a text description of where you clicked, and a screen shot during each click. Once you capture these steps, you can save them to a file that can be used to help solve a computer problem.
Note: When you record steps on your computer, anything you type will not be recorded. If what you type is an important part of recreating the problem you're trying to solve, use the comment feature to describe where the problem is occurring. Some programs, like a full-screen game, might not be captured accurately or might not provide useful information.

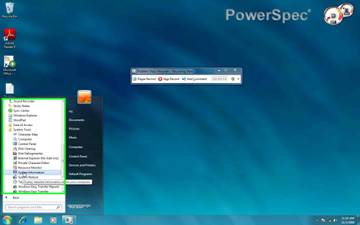
To open Problem Steps Recorder, click the Start button and type Steps. Click Record Steps to reproduce a problem.
To adjust settings:
- If it is not already open, Start Problem Steps Recorder.
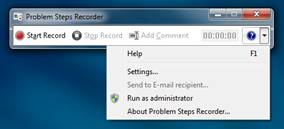
- Click the help down arrow and then click Settings.
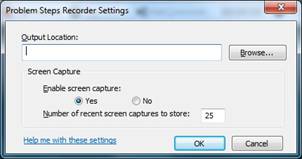
You can change the following settings for Problem Steps Recorder:
- Output Location: If you don't want to be prompted to save a file after recording, click the Browse button to set a default output file name.
- Enable screen capture: If you don't want to capture the screen shots along with the click information, select No. This might be a consideration if you are taking screen shots of a program that contains personal information, such as bank statements, and you are sharing the screen shots with someone else.
- Number of recent screen captures to store: While the default is 25 screens, you can increase or decrease the number of screen shots.
Note: When you adjust settings for Problem Steps Recorder, they're only saved for your current session. After you close and reopen Problem Steps Recorder, it will return to the default settings.

To record and save steps on your computer:
- If it is not already open, start Problem Steps Recorder (Click the Start button and type Steps).
- Click Record steps to reproduce a problem.
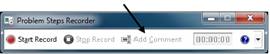
- Click Start Record.
- Go through the steps on your computer to reproduce the problem. You can pause the recording at any time, and then resume it later.
- When you are finished recording, Click Stop Record.
- In the Save as dialog box, type a name for the file, and then click Save (the file is saved with the .zip file name extension).
To add comments to problem steps:
- Start recording.
- When you want to add a comment, click Add Comment.
- Use your mouse (click and drag) to highlight the part of the screen that you want to comment on, type your text in the Highlight Problem and Comment box, and then click OK.
To view the steps you recorded:
- When you are finished recording, Click Stop Record.
- In the Save as dialog box, type a name for the file, and then click Save the file is saved with the .zip file name extension).
- Open the saved .zip file, and then double-click the file. The document will open in your browser.
To send the problem steps in e-mail:
- After recording and saving a .zip file, click the help down arrow, and then click Send to E-mail recipient. This will open an e-mail message in your default e-mail program with the last recorded file attached to it.
- Note: You won't be able to click the Send to e-mail recipient option until you've recorded and saved a file.
Example of the contents of a file generated by the Problem Steps Recorder
Recorded Problem Steps
Before sharing this file, you should verify the following:
- The steps below accurately describe the problem.
- There is no information below or on any screenshots that you do not want others to see.
You can do the following:
- Review the recorded problem steps
- Review the recorded problem steps as a slide show
- Review the additional details
Example of Recorded Problem Steps
Problem Step 1:
User click on Start (push button) in Start.
Problem Step 2:
User click on All Programs (menu item) in Start menu.

Problem Step 3:
User click on Accessories (outline item) in Start menu.

Problem Step 4:
User click on System Tools (outline item) in Start menu.

Problem Step 5:
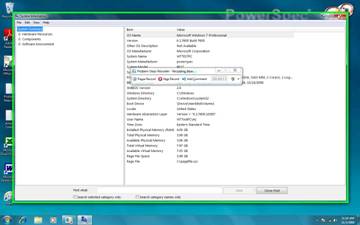
User click on System Information (menu item) in Start menu.
Problem Step 6:
User click on Close (push button) in System Information.
Additional Details
The following section contains the additional details that were recorded that can help find a solution for your problem. These details help accurately identify the programs and UI you used while recording the problem steps. This section may contain text that is internal to programs that only very advanced users or programmers may understand.
Please review these details to ensure that they do not contain any information that you would not like others to see.
-------------------------------------------------------------
Recording Session:
Problem Steps: 6, Missed Steps: 0, Other Errors: 0
Operating System: 7600.16385.amd64fre.win7_rtm.090713-1255 6.1.0.0.2.48
Problem Step 1: User left click on "Start (push button)" in "Start"
Program: Windows Explorer, 6.1.7600.16385 (win7_rtm.090713-1255), Microsoft Corporation, EXPLORER.EXE, EXPLORER.EXE
UI Elements: Start, Start, Button
Problem Step 2: User left click on "All Programs (menu item)" in "Start menu"
Program: Windows Explorer, 6.1.7600.16385 (win7_rtm.090713-1255), Microsoft Corporation, EXPLORER.EXE, EXPLORER.EXE
UI Elements: All Programs, All Programs, Button, Desktop More Programs Pane, Start menu, DV2ControlHost
Problem Step 3: User left click on "Accessories (outline item)" in "Start menu"
Program: Windows Explorer, 6.1.7600.16385 (win7_rtm.090713-1255), Microsoft Corporation, EXPLORER.EXE, EXPLORER.EXE
UI Elements: Accessories, All Programs, Favorites, SysTreeView32, All Programs, NamespaceTreeControl, Desktop NSCHost, Start menu, DV2ControlHost
Problem Step 4: User left click on "System Tools (outline item)" in "Start menu"
Program: Windows Explorer, 6.1.7600.16385 (win7_rtm.090713-1255), Microsoft Corporation, EXPLORER.EXE, EXPLORER.EXE
UI Elements: System Tools, All Programs, Favorites, SysTreeView32, All Programs, NamespaceTreeControl, Desktop NSCHost, Start menu, DV2ControlHost
Problem Step 5: User left click on "System Information (menu item)" in "Start menu"
Program: Windows Explorer 6.1.7600.16385 (win7_rtm.090713-1255), Microsoft Corporation, EXPLORER.EXE, EXPLORER.EXE
UI Elements: System Information, All Programs, Favorites, SysTreeView32, All Programs, NamespaceTreeControl, Desktop NSCHost, Start menu, DV2ControlHost
Problem Step 6: User left click on "Close (push button)" in "System Information"
Program: System Information, 6.1.7600.16385 (win7_rtm.090713-1255), Microsoft Corporation, MSINFO32.EXE, MSINFO32.EXE
UI Elements: Close, System Information, #32770
Technical Support Community
Free technical support is available for your desktops, laptops, printers, software usage and more, via our new community forum, where our tech support staff, or the Micro Center Community will be happy to answer your questions online.
Forums
Ask questions and get answers from our technical support team or our community.
PC Builds
Help in Choosing Parts
Troubleshooting