Breadcrumbs
How to run an SFC scan in Windows 10
The System File Checker (SFC) is a tool you can use to scan for and attempt to repair corrupted Windows files. This is a catch-all type of tool you can run if you're having issues with Windows and having trouble tracking it down. Issues SFC might help with include crashing, Windows apps (Settings, the Start Menu, File Explorer, etc...) not functioning correctly, maybe even Windows updates not downloading and installing properly. SFC scans are not a guaranteed fix for Windows corruptions, sometimes the files won't be repairable or it may not detect a corruption even though your issues persist. However, it's still a good tool to use to try and resolve issues, especially if you're trying to avoid resetting or reinstalling your operating system.
To run an SFC Scan, we first need to open up an administrative Command Prompt. You can do that in a couple of different ways:
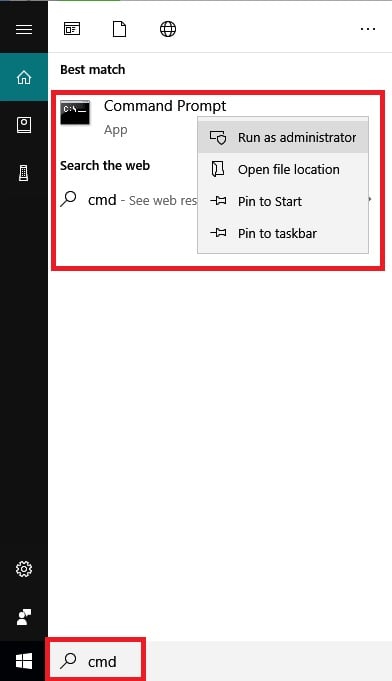
The easiest way is by searching for it. Click on your search bar and type cmd. Right-click Command Prompt and select Run as administator.
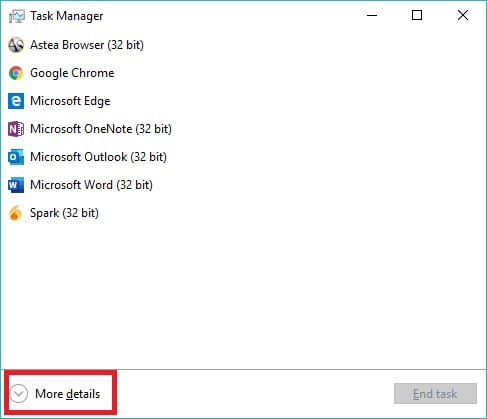
If you cannot search for it for some reason, you can also open it through Task Manager Press ctrl+shift+esc to open up Task Manager directly, or press ctrl+alt+del then select Task Manager from the menu. Make sure you click more details on the bottom left if you're not looking at the full view with all the different sections and details.
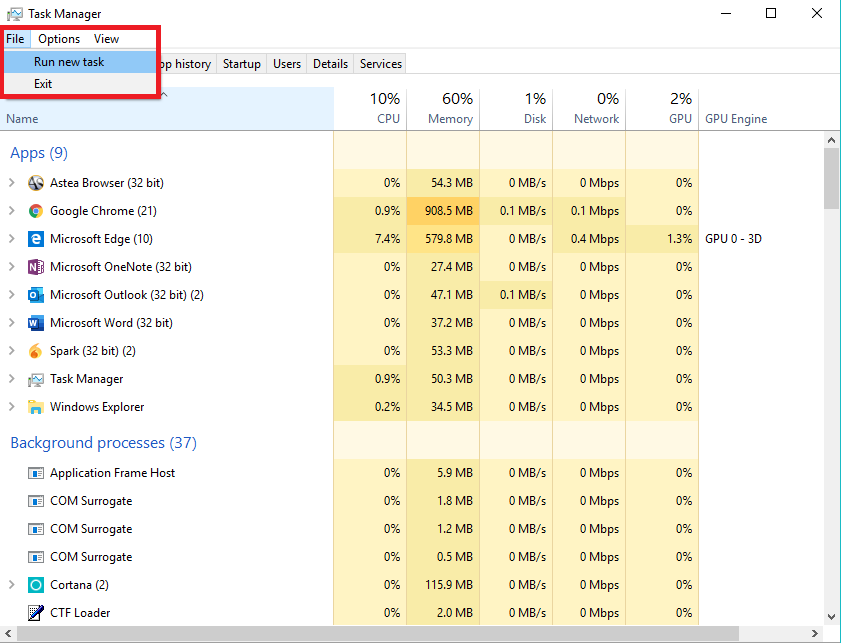
Click File on the top-left then select Run new task.
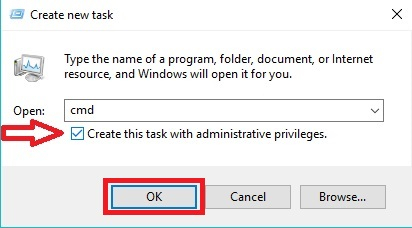
Type cmd and check the box that says Create this task with administrative privileges, then click OK.
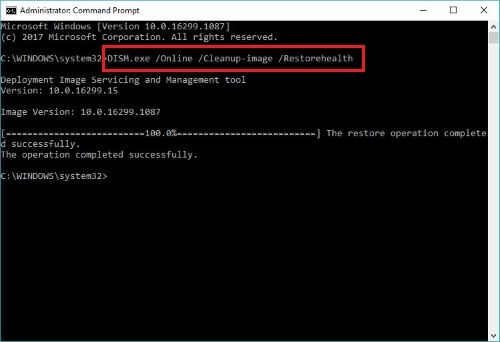
Once you have an administrative command prompt Window open, the first step is running the Deployment Image Servicing and Management (DISM) tool. DISM will download files via Windows Update that it will use to repair your computer. Type the following command
DISM.exe /Online /Cleanup-image /Restorehealth
and hit enter. The process will take some time to complete, a loading bar will display to show progress.
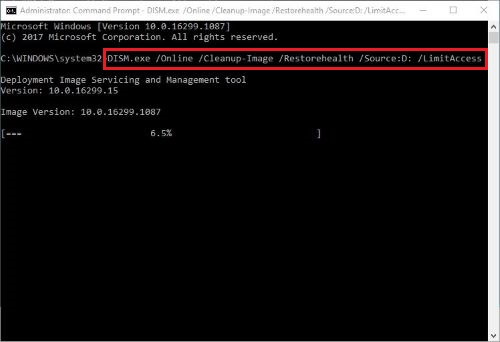
One thing to note is that if your Windows Update client is broken in some way DISM won't work. In those cases, you'll have to use installation/recovery media or a mounted disk image as the source of the repair files. We'll modify the command a bit to
DISM.exe /Online /Cleanup-image /Restorehealth /Source:(source location goes here) /LimitAccess.
The source location is the file location for the recovery media or the mounted image. For example, if you have a Windows 10 flash drive plugged in showing as the D drive, you would type /Source:D: . If you had a disk image mounted at E:/RepairSource/ExtraFolder, you would type /Source:E:/RepairSource/ExtraFolder. It's the exact file location for the files/media.
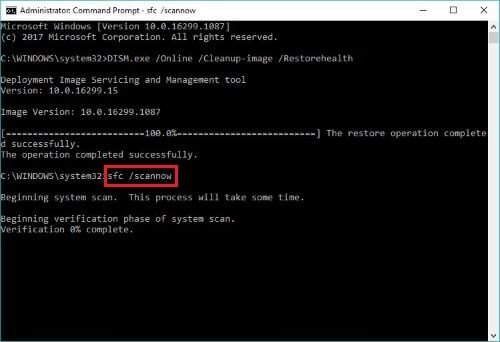
Once you've run DISM, you can start the scan. Type sfc /scannow and hit enter. Progress will be displayed on the screen, once it finishes it will tell you if it detected any errors and whether they were repaired or not.
The easiest way is by searching for it. Click on your search bar and type cmd. Right-click Command Prompt and select Run as administator.

If you cannot search for it for some reason, you can also open it through Task Manager Press ctrl+shift+esc to open up Task Manager directly, or press ctrl+alt+del then select Task Manager from the menu. Make sure you click more details on the bottom left if you're not looking at the full view with all the different sections and details.

Click File on the top-left then select Run new task.

Type cmd and check the box that says Create this task with administrative privileges, then click OK.

Once you have an administrative command prompt Window open, the first step is running the Deployment Image Servicing and Management (DISM) tool. DISM will download files via Windows Update that it will use to repair your computer. Type the following command
DISM.exe /Online /Cleanup-image /Restorehealth
and hit enter. The process will take some time to complete, a loading bar will display to show progress.

One thing to note is that if your Windows Update client is broken in some way DISM won't work. In those cases, you'll have to use installation/recovery media or a mounted disk image as the source of the repair files. We'll modify the command a bit to
DISM.exe /Online /Cleanup-image /Restorehealth /Source:(source location goes here) /LimitAccess.
The source location is the file location for the recovery media or the mounted image. For example, if you have a Windows 10 flash drive plugged in showing as the D drive, you would type /Source:D: . If you had a disk image mounted at E:/RepairSource/ExtraFolder, you would type /Source:E:/RepairSource/ExtraFolder. It's the exact file location for the files/media.

Once you've run DISM, you can start the scan. Type sfc /scannow and hit enter. Progress will be displayed on the screen, once it finishes it will tell you if it detected any errors and whether they were repaired or not.




.png)
